User Interface, Inventory Tabs, Compass and Tribes
User Interface (UI)
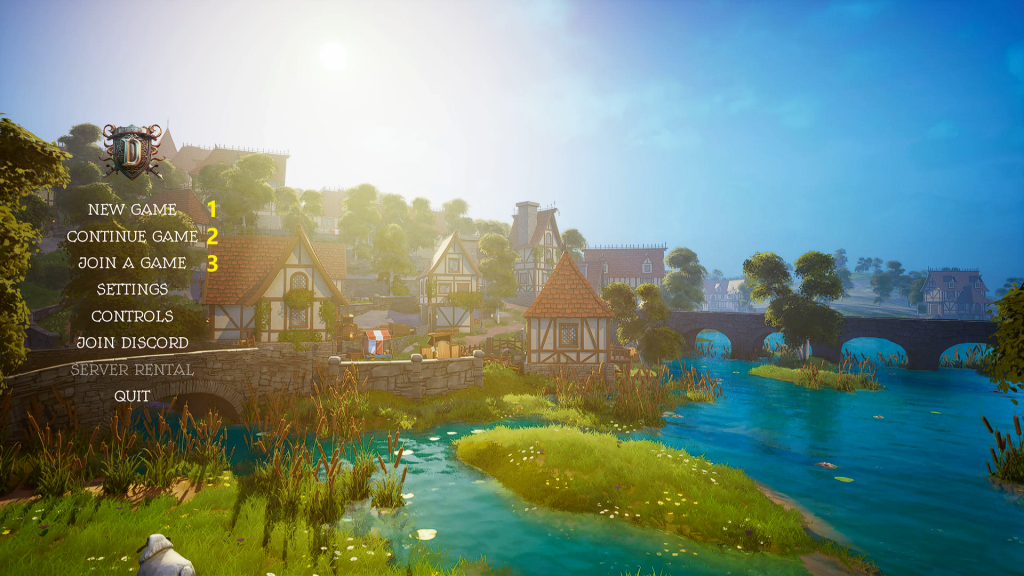
- Start a new Single or Co-op game (Settings can be changed later).
- Continue with a saved game.
- Join the official Servers (USA or EU).
Servers can be open to all or Private.
Update v0.5.4– Added “Delete Save” button.
Game Play Settings
- Camera Distance– Manually set how far the overhead camera is to the character in the foreground or use the Scroll Wheel in game to go from -200 to 260.
- Directional Mouse Attack– Allows to set the attack direction by moving the Mouse right before the attack.
- Temperature– Fahrenheit or Celsius.
- Sprint Mode– Hold or Toggle
- Camera Shake Scale– How much the screen shakes (0=Off).
- Compass- (HUD) See below.
- Tutorial- Press “G” to hide.
- Tips, Chat messages and Combat information*.
- Debuffs appear here like Poison, Encumbered or Sickness.
- Health, Water & Food levels and Stamina.
- Buffs appear here.
- Hotbar (Keys 1-8).
- Crosshair for aiming.
- Horde Night Notification here.
- When on horseback, the horse information appears here.
- Crafting, gather additions and if anything is removed from Inventory appears here.
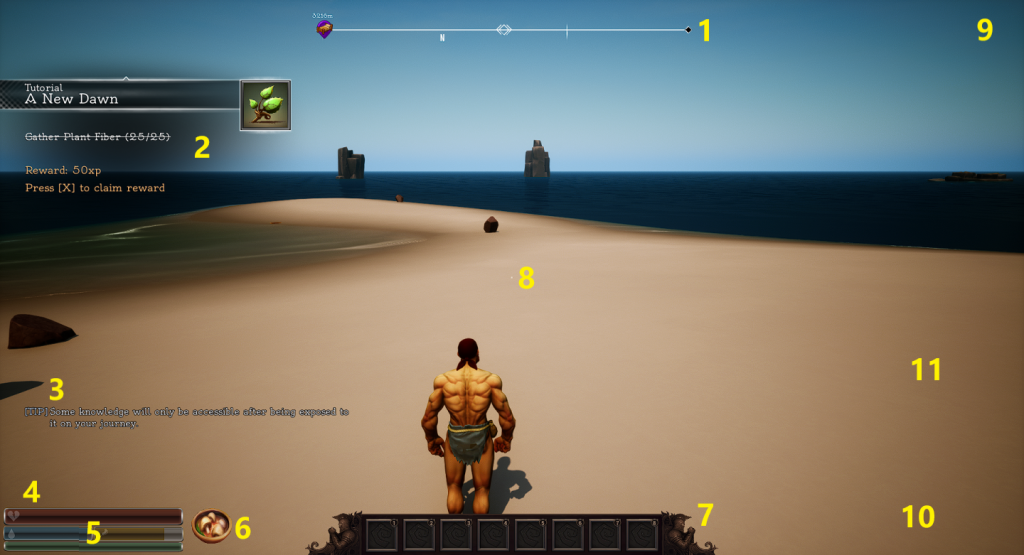
Press “F10” to remove everything from screen, IE HUD, Hotbar etc.
Press “L” to enable Free Camera Mode.
More information on the Tutorial System is here.
*Update v0.5.4 made the chat logs and other messages stay longer.
inventory
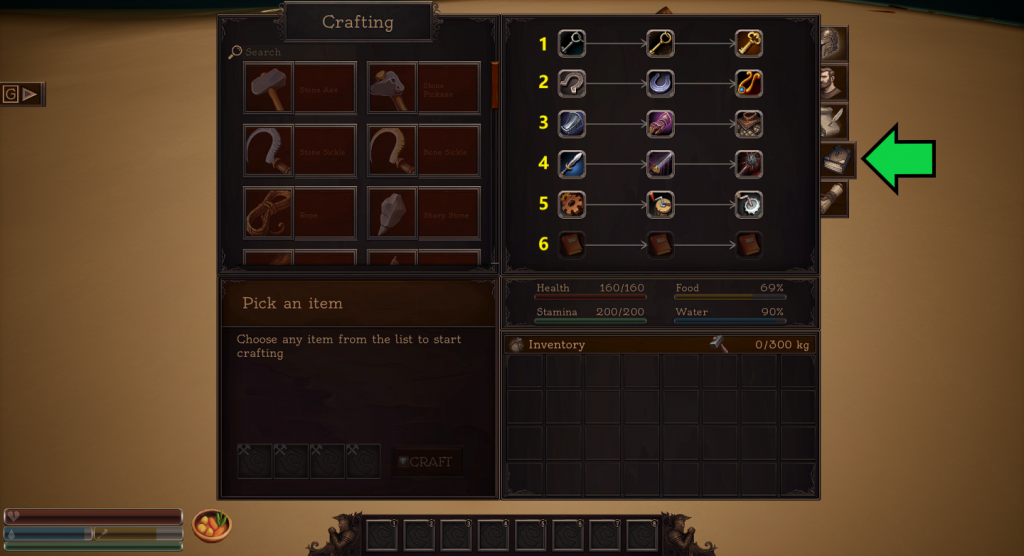
Press “I” or “Tab” to open Inventory screen and its the top right hand section that changes per tab as shown by the yellow square below.
Armour
- Crafting Section*.
- Armour and Clothing Slots.
- Name and current level.
- Put a book or scroll here to learn it.
- Current food buff.
- Health, Food/Water and Stamina numbers.
- Click the Bag icon to “sort” inventory.
- Repair Hammer icon**.
- Current weight being carried.
- Current Body Temperature***.
- Current Armour Weight and limit before being encumbered.
- Armour (Clothing).
- Character Level (Item Unlocks).
- Mastery (Skills).
- Knowledge (Skills to learn).
- Schematics– (Schematics list).
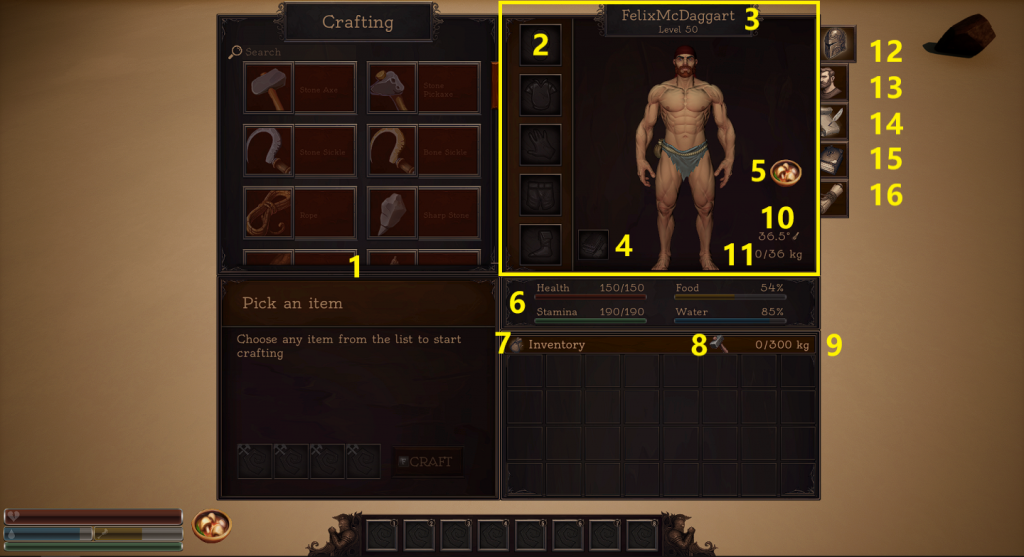
*More information on the Crafting is here.
***More information on Body Temperature is here.
**Repair an item
- Mouseover the item to be repaired to find out what materials or item is required and put them/it in the Inventory.
- Click on the Hammer icon and then click on the item to repair it to 100% durability.
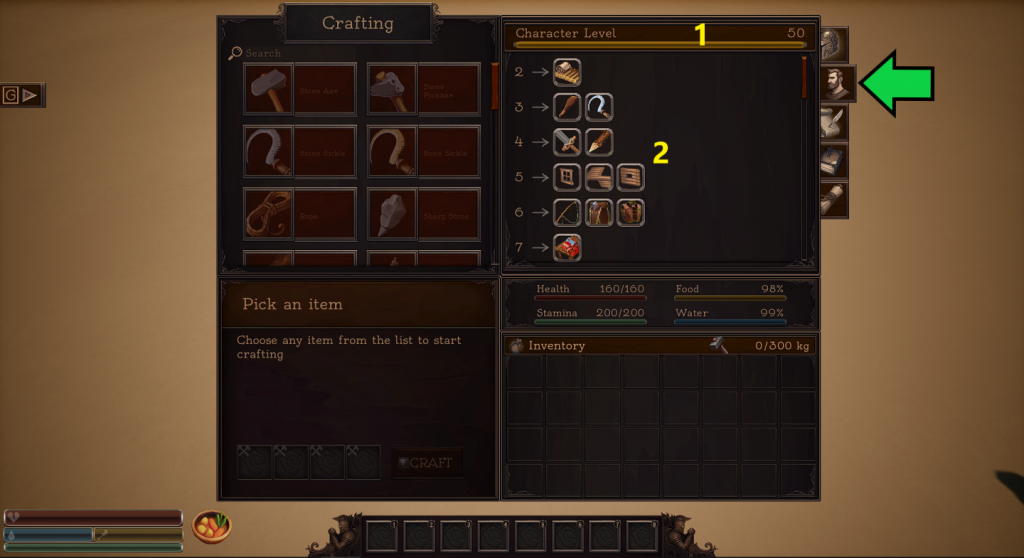
Character Level
- Character level progression to max level 50 and current level.
- All the things that are unlocked as the character levels up.
mastery
This tab shows all the skills that are leveled by doing something and each skill gives relevant bonuses.
All Skills start at level 1 (100%) and go to level 11.
*Placing structures and completing wooden walls (XP is granted only after the pickup window ends and is dependant on the structure).
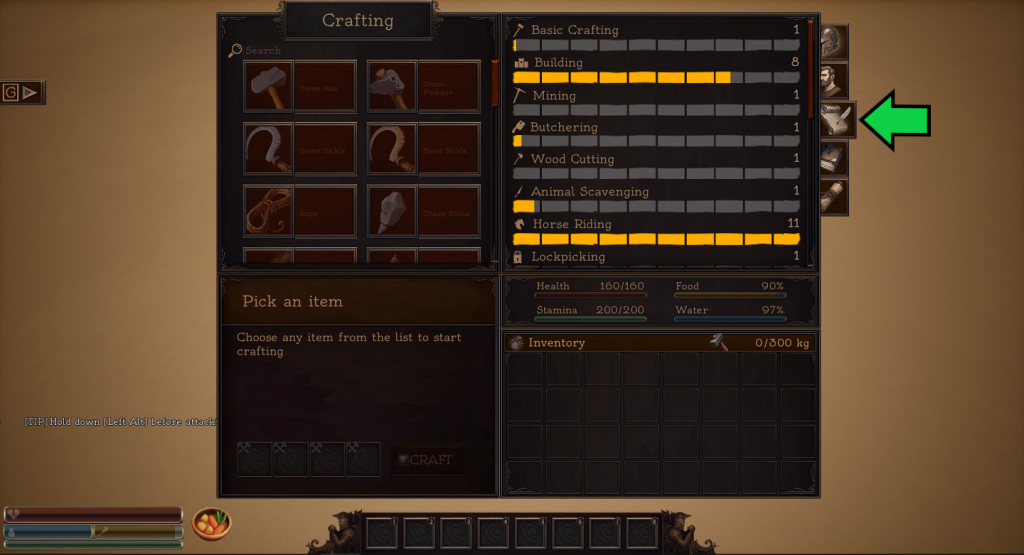
| Skill | What levels it | Bonus | Skill Level | ||||||||||
| 1 | 2 | 3 | 4 | 5 | 6 | 7 | 8 | 9 | 10 | 11 | |||
| Basic Crafting | Crafting any Items | Reduces Crafting Duration | 0 | -20% | -40% | -60% | -80% | -100% | -120% | -140% | -160% | -180% | -200% |
| Building | Placing Structures* | Reduces Repair Costs | 0 | -8% | -16% | -25% | -30% | -40% | -50% | -60% | -70% | -80% | -90% |
| Mining | Mining Ore | Increases resources gained | 100% | +120% | +130% | +140% | +160% | +180% | +200% | +220% | +240% | +260% | +300% |
| Butchering | Use the Butcher Table | Increases resources gained | 100% | +130% | +150% | +170% | +200% | +250% | +300% | +400% | +600% | +900% | +1300% |
| Wood Cutting | Chopping Trees | Increases resources gained | 100% | +120% | +130% | +140% | +160% | +180% | +200% | +220% | +240% | +260% | +300% |
| Animal Scavenging | Kill and Harvest Animals | Increases resources gained and speed of Butchering | 100% | +120% | +140% | +160% | +190% | +220% | +250% | +300% | +350% | +400% | +500% |
| Horse Riding | Ride a Horse | Increases Horse Sprint Speed | 0 | +2 | +4 | +6 | +8 | +10 | +13 | +16 | +19 | +22 | +25 |
| Lock Picking | Pick Chest Locks | Decreases the chance of breaking a Lockpick | |||||||||||
| Fishing | Go Fishing | Increases the chance to catch a fish quicker | |||||||||||
| Taming | Tame Animals | Increases the chance of taming an animal | 0 | +2% | +4% | +8% | +14% | +20% | +30% | +45% | +58% | +65% | +80% |
| Metal Working | Refining Items in the Anvil | Increases the Output Durability in the Anvil | 0 | +3 | +5 | +7 | +10 | +14 | +18 | +22 | +26 | +30 | +35 |
| Farming | Harvesting Crops | Increases the Harvest Yield | 0 | +10% | +20% | +30% | +50% | +70% | +100% | +130% | +170% | +200% | +250% |
| Longbow | Doing Damage to NPC’s | Slight increase in damage | 0 | +1 | +2 | +3 | +4 | +5 | +7 | +8 | +9 | +10 | +11 |
| Crossbow | |||||||||||||
| Heavy Sword (2 Handed) | |||||||||||||
| Light Sword (1 Handed) | |||||||||||||
| Heavy Axe (2 Handed) | |||||||||||||
| Light Axe (1 Handed) | |||||||||||||
| Clubs (2 Handed) | |||||||||||||
| Hammers (2 Handed) | |||||||||||||
knowledge
What to look out for:
These items are found in Loot or bought from the Traders.
- Lockpicking- Unlock Copper/Iron/Steel Chests.
- Taming- Tame Farm Animals/Horses/TBA.
- Armour Crafting- Craft armour to Rare/Epic/Legendary qualities.
- Weapon Crafting- Craft weapons to Rare/Epic/Legendary qualities.
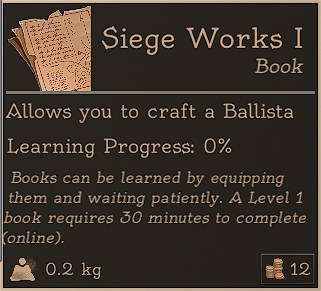
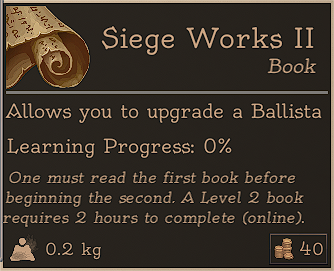
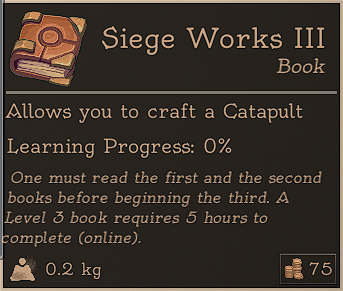
- Siege Works- Craft a Ballista/Upgrade Ballista/Craft Catapults.
- TBA (maybe Alchemy soon?).
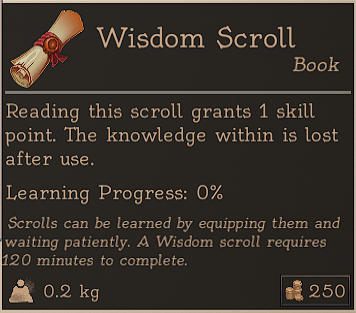
Wisdom Scrolls are found in Loot and can be learnt by reading and will give one extra Skill Point. >
More information on Weapon Crafting is here.
More information on Armour Crafting is here.
More information on Horde Night is here.
More information on Traders is here.
schematics
Schematics are items that need to be found when looting, in Horde Night drops or bought at the Traders.
The Schematic must be learnt by putting it in the #4 slot in the Armour Tab as well as reaching a certain level to craft the final item.
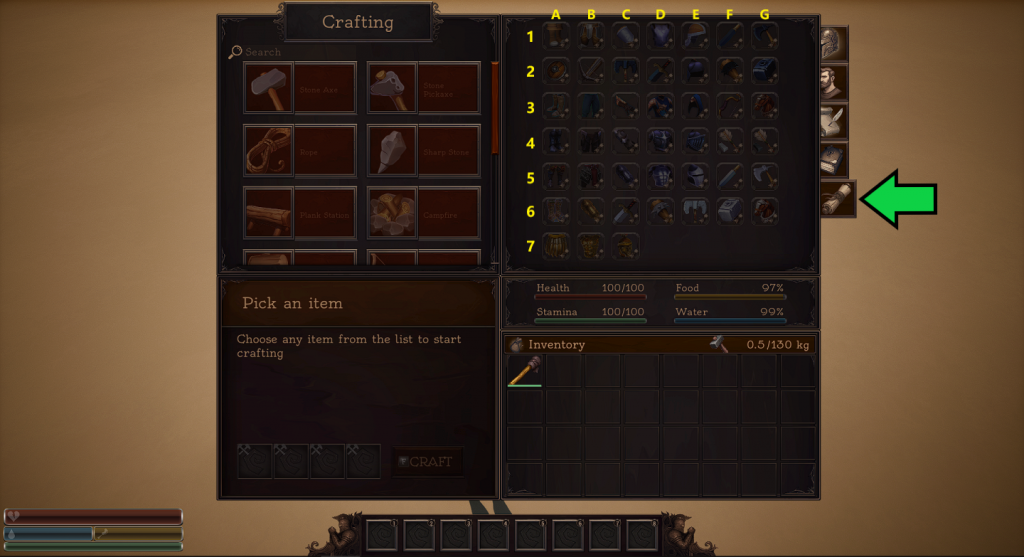
| Grid | Schematic | Grid | Schematic | Grid | Schematic | ||
| A1 | Warrior Boots | A2 | Iron Shield | A3 | Rogue Boots | ||
| B1 | Warrior Trousers | B2 | Crossbow | B3 | Rogue Trousers | ||
| C1 | Warrior Bracers | C2 | Iron Battle Axe | C3 | Rogue Gloves | ||
| D1 | Warriors Chestplate | D2 | Iron Greatsword | D3 | Rogue Outfit | ||
| E1 | Warriors Helmet | E2 | Metal Helmet | E3 | Rogue Hood | ||
| F1 | Iron Sword | F2 | Iron Club | F3 | Iron Bow | ||
| G1 | Iron Axe | G2 | Iron Hammer | G3 | Iron Horse Armour | ||
| A4 | Footman Boots | A5 | Knight’s Boots | A6 | Warlord Boots | ||
| B4 | Footman Trousers | B5 | Knight’s Trousers | B6 | Warlord Bracers | ||
| C4 | Footman Bracers | C5 | Knight’s Bracers | C6 | Steel Greatsword | ||
| D4 | Footman Chestplate | D5 | Knight’s Chestplate | D6 | Steel Club | ||
| E4 | Footman Helmet | E5 | Knight’s Helmet | E6 | Steel Battle Axe | ||
| F4 | Steel Arrow | F5 | Steel Sword | F6 | Steel Hammer | ||
| G4 | Iron Arrow | G5 | Steel Axe | G6 | Steel Horse Armour | ||
| A7 | Warlord Skirt | ||||||
| B7 | Warlord Chest Plate | ||||||
| C7 | Warlord Helmet | ||||||
compass
The Compass at the top of the screen shows:
- Any custom Map Markers set.
- The Spawn point set at a Bed (if any).
- The direction of facing (N- North).

More information on the Map and Map Markers is here.
tribes
Tribes are basically “teams” in Divided Land and by joining up the players can share access to doors, workbenches and chests and also the option to share XP if in close proximity to each other.
To “Tribe up”, first Interact (Default “E“) with a player and select the top option. Then press “T” to access the Tribe Management screen.
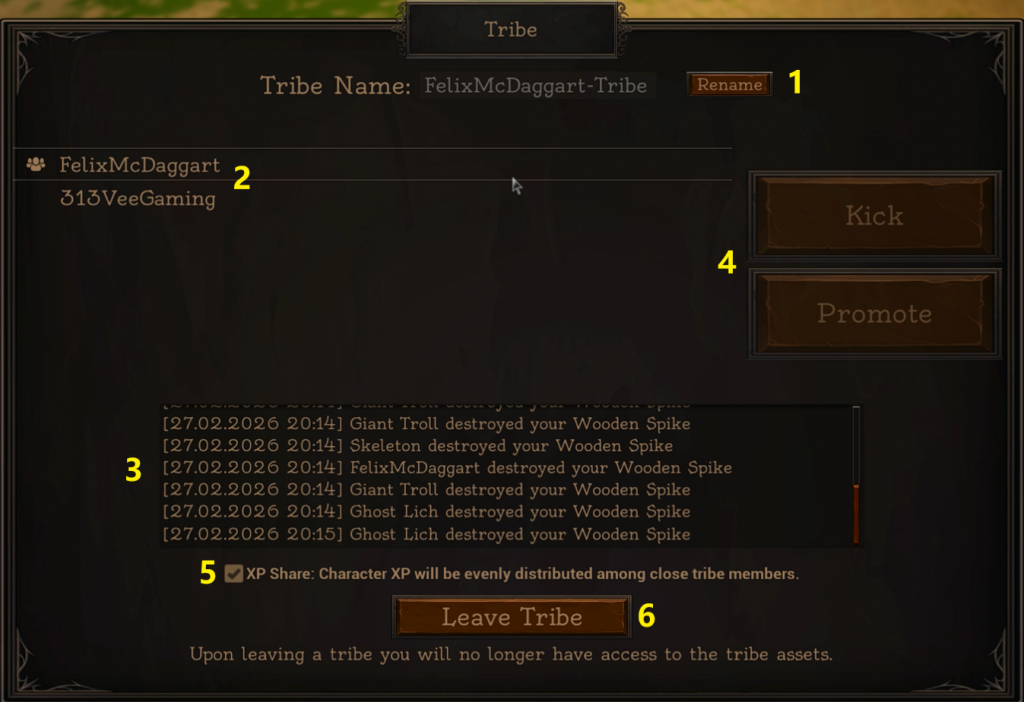
The range of Shared XP is about 500m (Map size=16.5 Km²) and Admins cannot be kicked by other Admins or demoted.

- Set and edit Tribe name.
- Members list.
- Information on anything that belongs to the Tribe (Tribe Log).
- Kick out of the Tribe or Promote to give admin rights shown by the 3 person icon next to a name.
- Share XP or not.
- Had enough?