How to Build, Construction Materials and Safezone Table
- Building Hammer.
- Build Menu- Menu Controls.
- Snap to Grid.
- Demolish, Repair and Replace.
- Structure & Roof.
- Workshop (Crafting Tables etc and most Technology Tree Unlocks).
- Furniture (Decoration).
- Outdoor (Campfire, Handcart, Traps and NPC Buildings).
- Construction Materials.
- Damage To Structures.
- Territorial/Safezone Table.
- Video Guides.
Update 1.0 added Metal Building pieces, some more Furniture, an extra Handcart function and the Signal Tower.
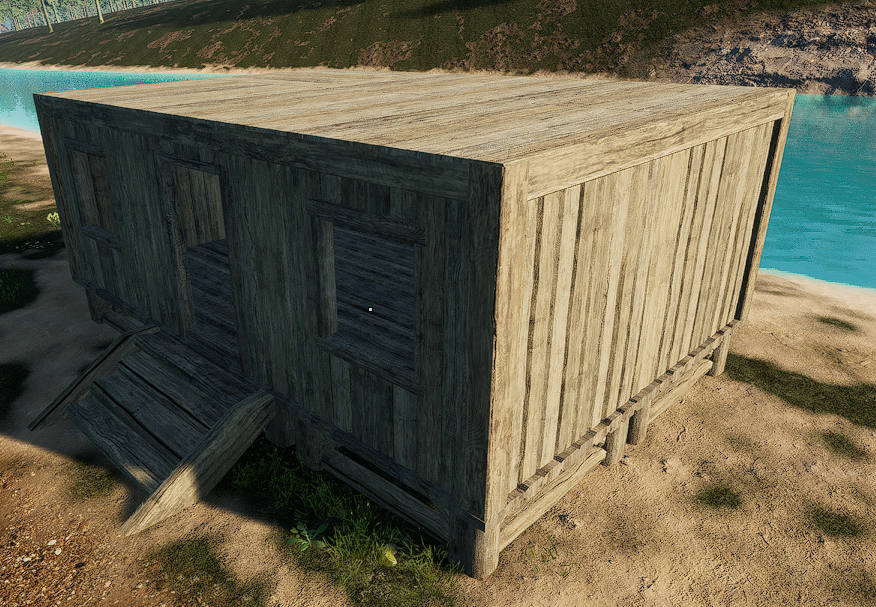
This guide and subsequent Videos will hopefully explain some of the intricacies evolved when base building in No One Survived. Once you know how and what to build, the only thing left is to explore and find the perfect build site. It should ideally be on even and flat ground, near lots of Trees with some Stone nodes about, close to a Water Source and away from any vicious Wildlife or buildings with Zombies in!
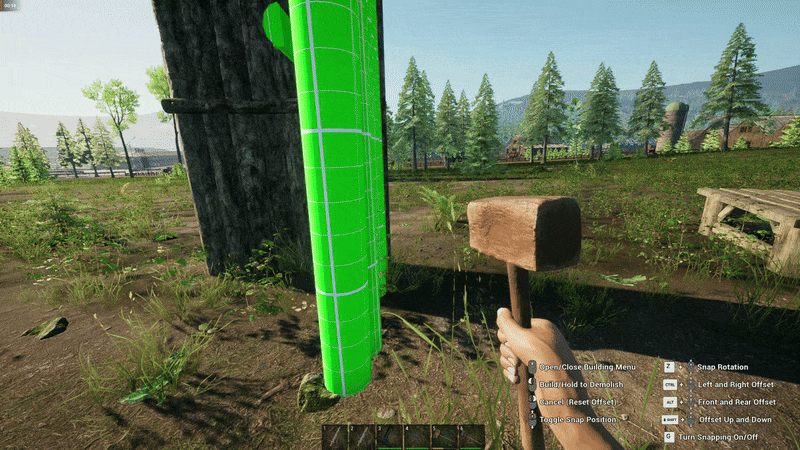
You will need to have a Building Hammer in your Toolbar and then after equipping it (in your hand) press the Middle Mouse Button (MMB).
If you punch the air, the Hammer isn’t equipped and if nothing happens check your Key bindings in the Escape Menu (Controls).
The Hammer can be in any slot for it to work and can be crafted from x1 Log in your own Craft Menu ![]() (Press the Hammer symbol when in Inventory UI) or a Crafting Table.
(Press the Hammer symbol when in Inventory UI) or a Crafting Table.

Doors and Windows can still be Open/Closed with the Hammer equipped but interaction with objects will need the Hammer to be unequipped to use ie: Beds, Storage and Cars.

Building
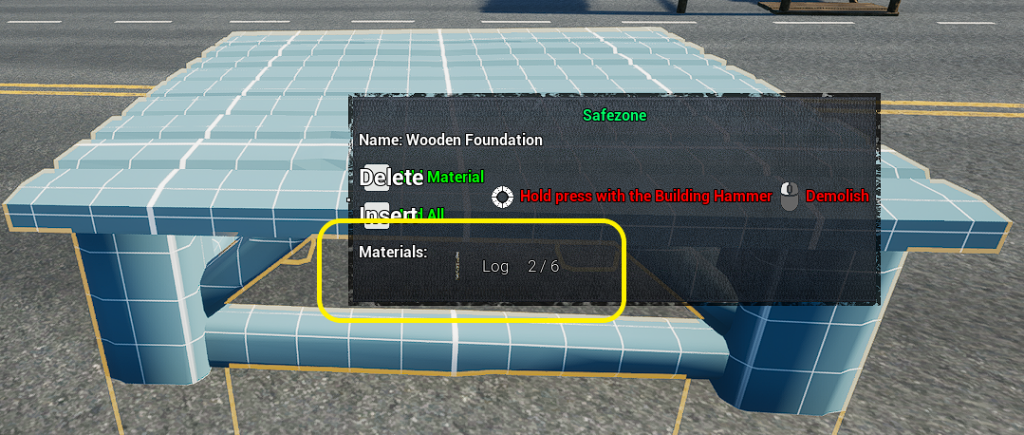
*For purposes of some of the videos, the keybinds are: Delete is “E” and Insert is “F“
No One Survived lets you place “blueprints” first allowing you to plan your build before finishing it reducing the possible waste of resources gathered.
After completing a planned build and ready to construct it go to a specific “blue” section and highlight it with the Aiming Cursor.
*Press “E” to add materials one at a time or “F” to add all the required resources (if you have them in your Inventory) at once to complete that section.
You can hover over any object to see what is required to finish the build without the Hammer needing to be equipped .
Start adding materials from the bottom first and work your way up and a good order is:
- Foundations.
- Beams (Horizontal).
- Columns (Vertical) .
- Walls/Doors/Windows or Roof.
All building types of construction (Wood/Stone/Brick/Glass/Metal etc) are unlocked from the start and as long as the resources are available (gathered, crafted or looted) then anything can be built first without the need to build in wood and then upgrade.
Stone Castles are just a dream and a Pickaxe away…
You might not be able to see through the blue building blueprints/layout of your base, but Wildlife and Zombies can!
Foundation first, Columns next and a Beam goes between two Columns. A Wall needs a Beam or a Column and a Roof section needs a Beam. Subsequent floor levels needs Columns placed beneath Columns.
Menu Controls
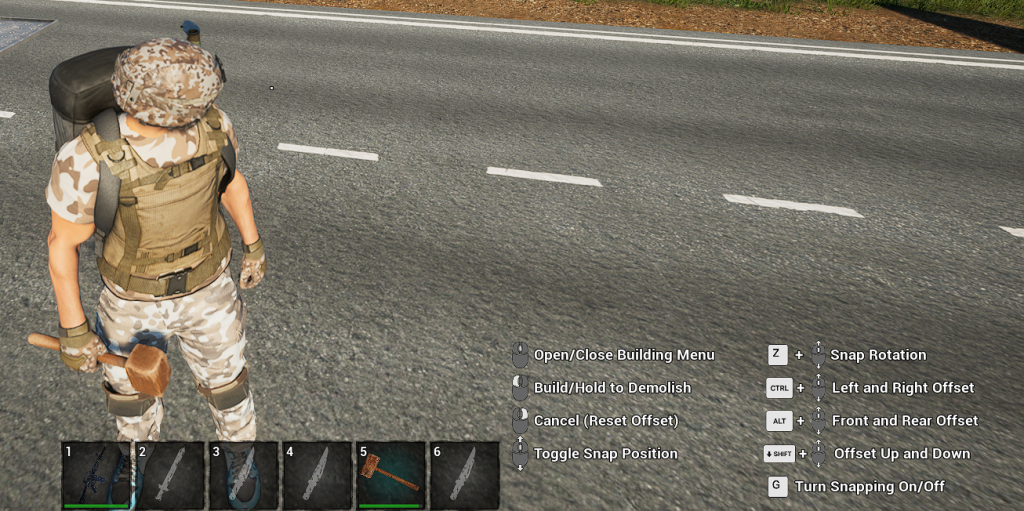
- MMB– (Middle Mouse Button) Open/Close Menu to enter Build Mode or to use the Hammer to interact on objects.
- LMB– (Left Mouse Button) Click once to Build, click and hold to Delete.
- RMB– (Right Mouse Button) Cancels any selected “blueprint” selected to build or closes main Building Menu UI.
- MMB-(Scroll Wheel) Rotate the selected building piece before placement (Clockwise and Counterclockwise).
- Z+ MMB– Pivots the snap rotation on its own axis rather than the selected building piece.
- CTRL + MMB– Moves the selected building piece Left or Right before placement.*
- ALT + MMB– Moves the selected building piece Forward or Back before placement.*
- SHIFT + MMB– Raise or Lower the selected building piece before placement. More on Stacking Foundations here.
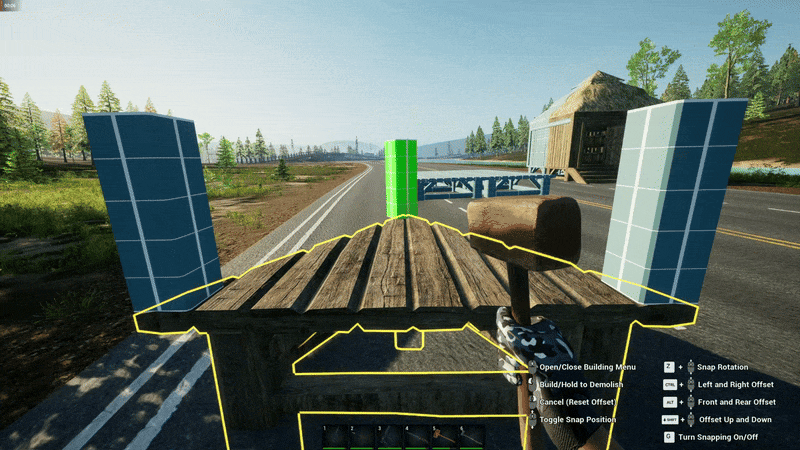
- Keypress G– Toggle offs Snap to Grid allowing free placement of items rather than placing to a grid. Turns back on after item is placed.
*Sometimes when viewing direction is changed these may swap function ie- Forward/Back maybe Left/Right.
Take care when placing lots of the same building item repeatedly as the direction/facing can change after initial placement of blueprint.
Snap to Grid On/Off
How to square up the Campfire with a Pot to the Window using “G” so the view can be appreciated whilst cooking.
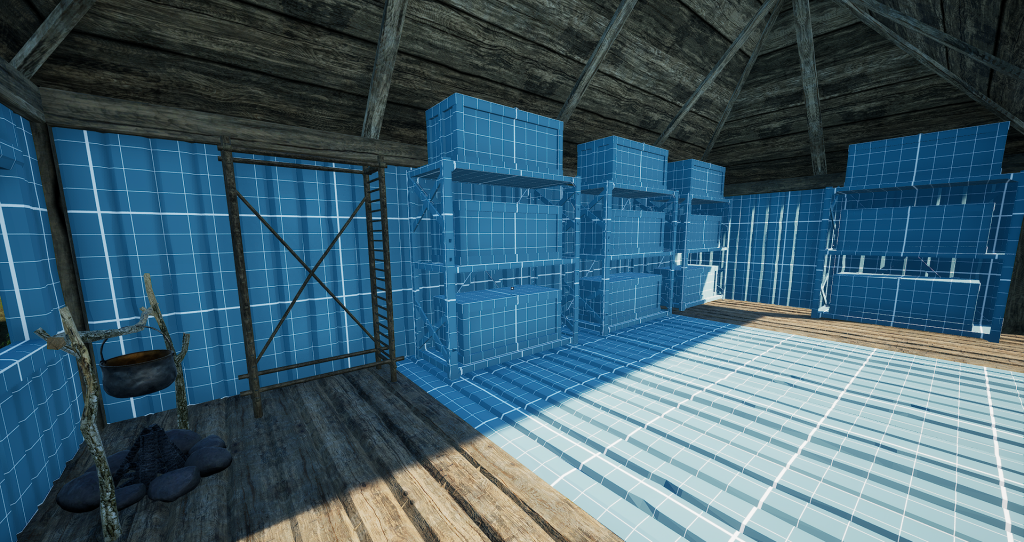
In the above example the offset controls were used to be able to fit both Wooden Box Frames and then stack x3 Storage Boxes on each one.
CTRL + MMB and ALT + MMB were used to move the blueprints Left, Right, Forward and Back.
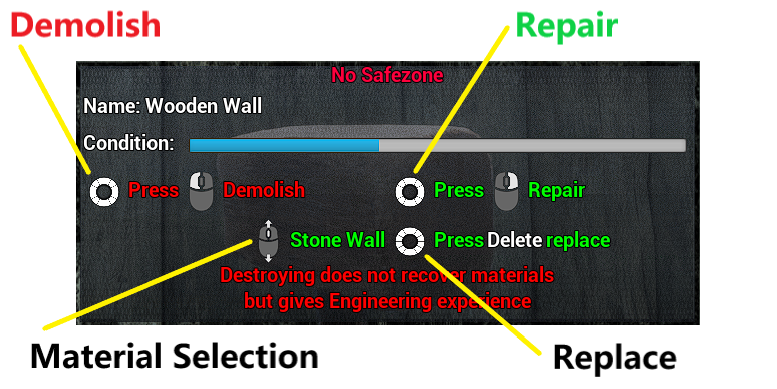
Demolish, Repair and Replace
With a Hammer equipped and in hand, RMB to cancel Build Menu selection and just hover over the object to Demolish, Repair or Replace. Note: Each function has its own progress wheel.
To Repair: Needs no materials so just click and hold LMB until the blue Condition bar is full again.
To Demolish: Click and Hold RMB.
To Replace : You need to have the required materials of the new option (Scroll Wheel selects) then press and hold “E“*.
Outside Stairs (Steps) can not be replaced (Upgraded).
Demolish– LMB | Repair– RMB | Replace– “E” | Material Select– Scroll Wheel
More information on Construction Materials is here.
Always take great care when demolishing as if the wrong Foundation, Beam, Column or Wall is demolished it could bring down other building pieces resulting in a destroyed base!
Construction materials are not regained when buildings are demolished like most craftable placeables are but it does give experience to the Engineering Skill.
You can Downgrade and Upgrade when Replacing as long as the building materials for the newly selected option are in your Inventory.
STRUCTURE & Roof
Foundations
Using SHIFT + MMB to raise or lower the Foundation and how Foundations can be stacked to make up to the original level to the rest of the base.
The Foundation could have been left as a single @ (0:08) and put Stairs instead to go from one level to another.
Stairs depend on the Foundation they are connected to, destroy that Foundation and the Stairs will go too.
Each Square Foundation has 4 Column snap build points. Columns can be “unsnapped” but connection From the Column to Beams proves near impossible
Triangle Foundations were introduced in Update 0.0.85 and they have 3 Column snap build points. The Columns are tricky to place to enable the Beams to fit.
The Triangle pieces are just an extension of the Square ones but offer more variety when Base Building.
Currently there are no Single Roof Pieces for Triangle Foundations just Floors as ceilings.
Beams/Columns
In the Build Menu, Wood has Wooden Posts and all other building materials have Columns so for the purposes of this guide all Posts/Uprights will be termed as Columns.
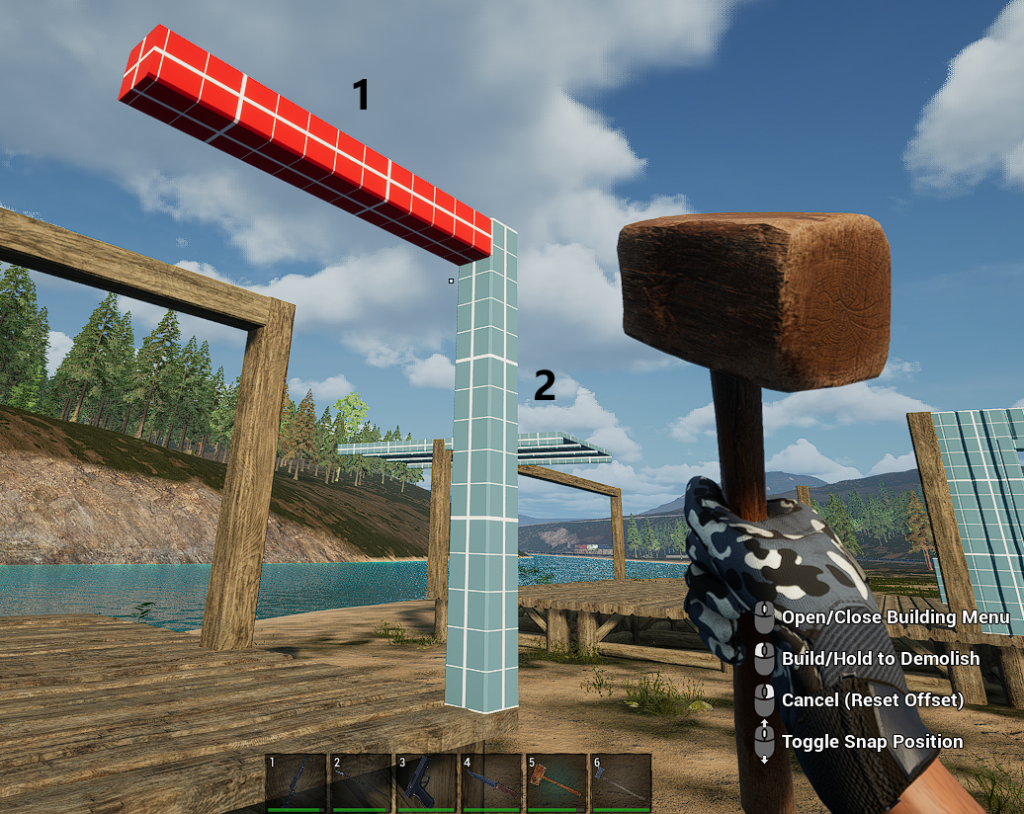
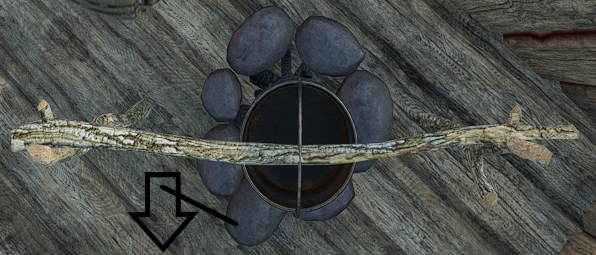
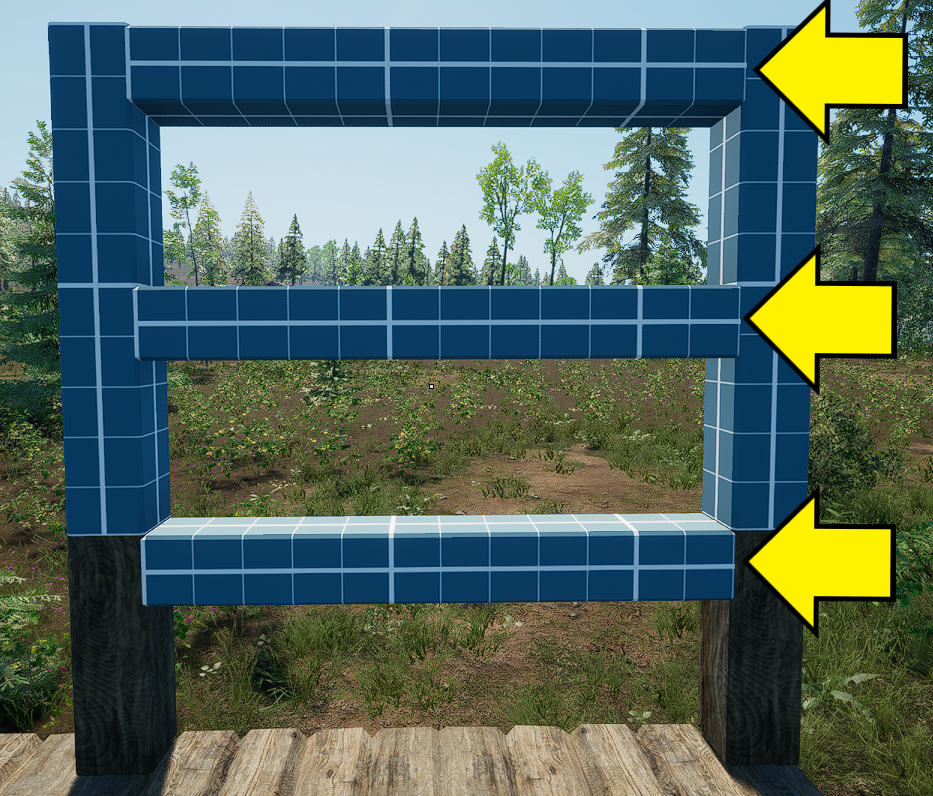
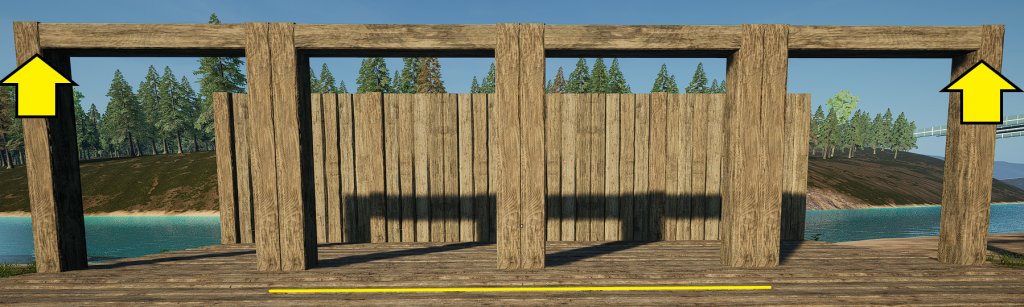
Beams (1) have no snap points other than Column (2) to Column and both Columns are needed to be built before the Beam to act as anchor points.
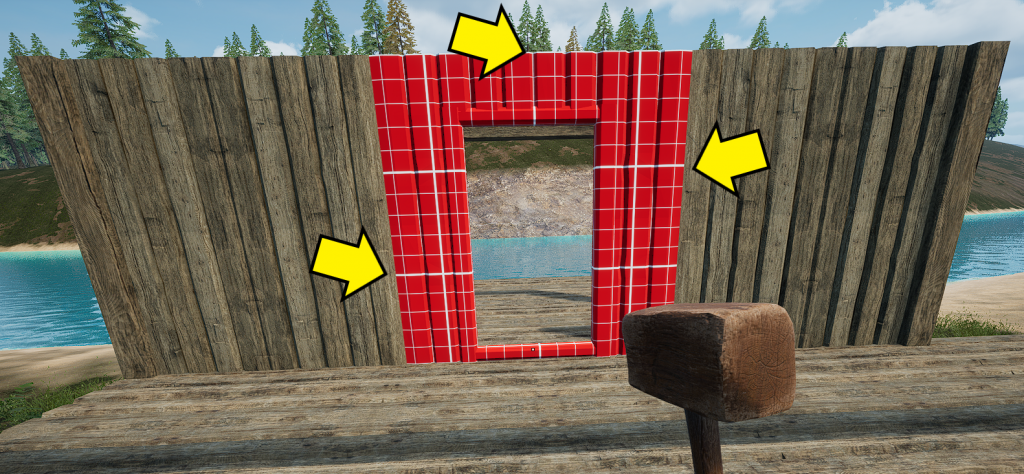
The Doorway cannot be built without some support from a Column on either side or the original Beam overhead.
1/3 High Columns have their own snap points so Beams can be set at 3 different heights if required, unfortunately it still costs x1 Log per third of a Column.
Columns (Posts) can be spaced 1, 2, 3 and 4 Foundations apart and be connected with Beams. Columns can be added later under Beams wherever there is a snap point but each Beam must have Column as an anchor point each end.
The yellow arrows show the points of Stability that the wall or Doorway needs to connect. The Doorway uses the Beam as support enabling to make bases with more open spaces.
To fill in Roof end pieces, Columns can be temporarily placed to enable the Triangle Walls to snap more easily as the Stability swaps from the Column to the Beam when the unbuilt Column is removed.
Each building material has its own version of a 1/3 high Wall or Triangle piece. Currently there are no half sections.
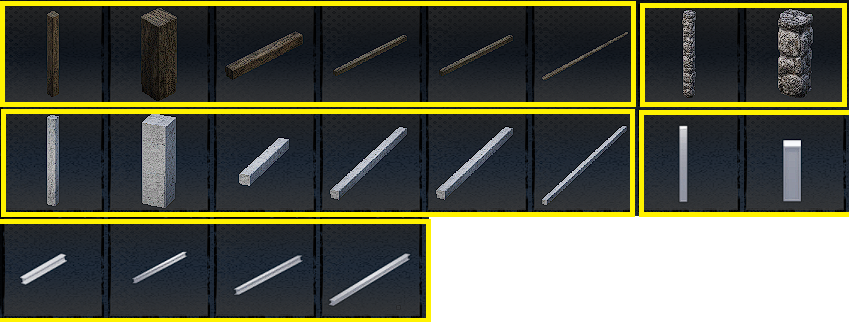
Beams and Columns have Wood, Stone, Concrete and Steel options but no Stone Beams. >
When a Beam is built between 2 Columns (1, 2, 3, or 4) the end Columns are the anchor points and if one of those is destroyed then the Beam comes down regardless of any Columns* between the anchor points. Likewise the Columns* are not affected or any Beams coming from them*
*Columns underlined in Yellow.
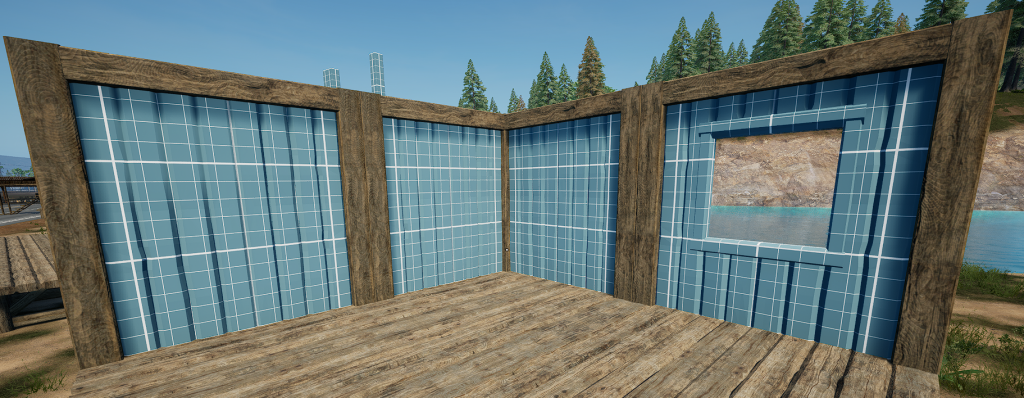
Walls/Doors/Windows
The Building Menu can be confusing as some images don’t match exactly as they appear. This is showing Doors and Windows in the Menu order with In Game image below.
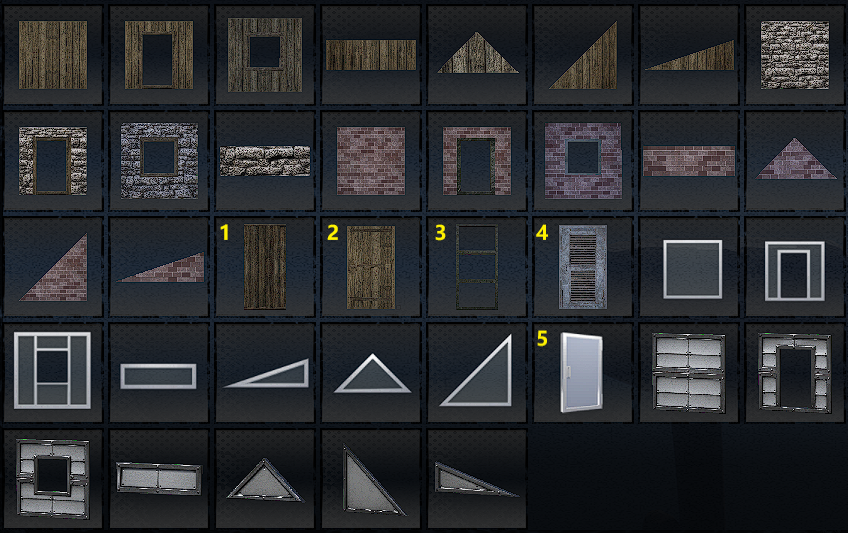
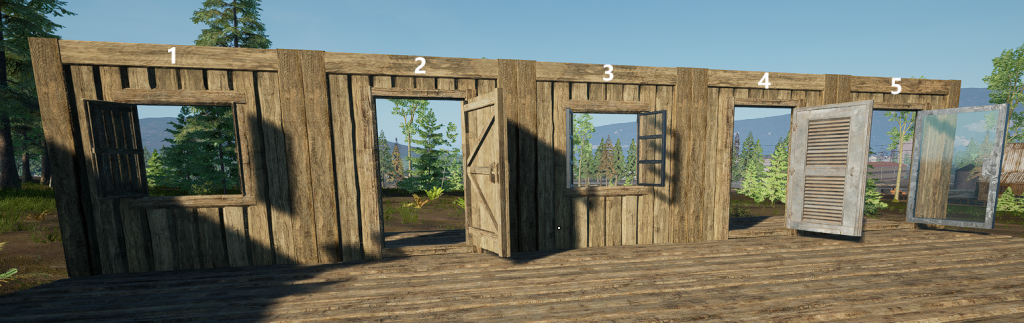
- Wooden Windows.
- Wooden Door.
- Glass Window.
- Iron Gate.
- Glass Door.
When building the next level up, Stability (support) becomes even more important.
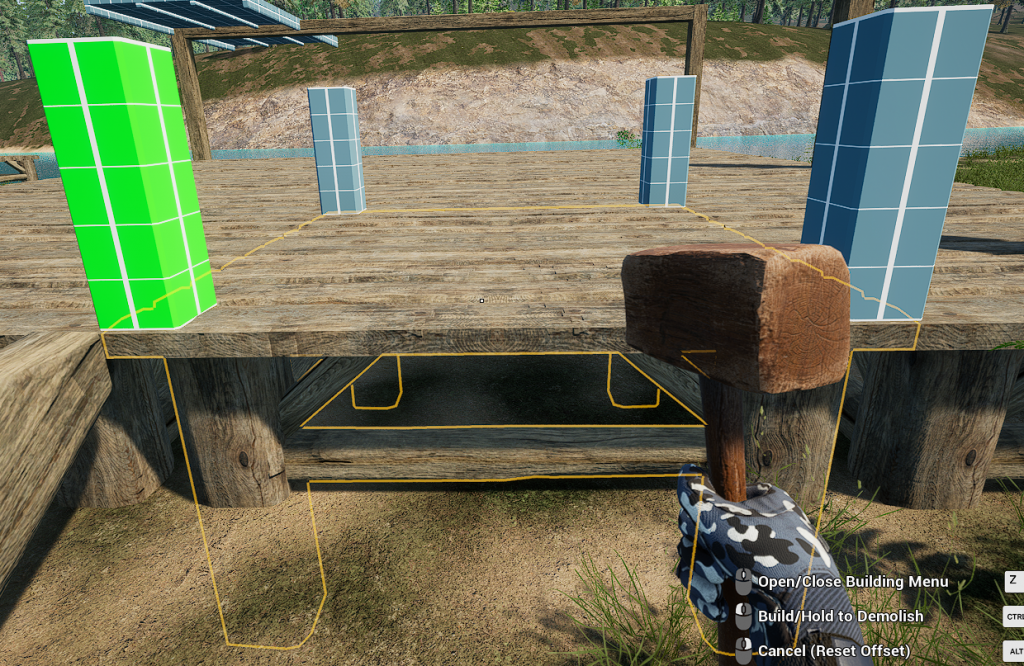
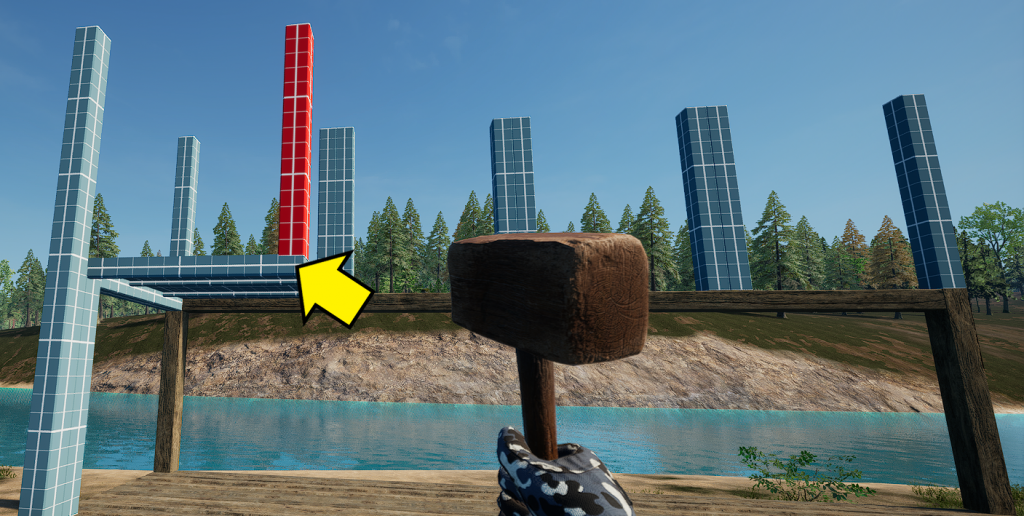
As you can place a Column anywhere on the Beam without needing one underneath, the Floor needs support from underneath, either another Column or a Beam where the yellow arrow is. (hence the red “Blueprint”).
To start with it is recommended that each snap Column point be filled on an outer Foundation edge and use only 1 wide Beams to ensure stability and prevent any disasters when/if anything is demolished.
Or use the Admin Menu and build in “Creative Mode” to learn the ropes (or Beams) to master building.
Green arrow marks the safe spot, Yellow arrow shows you can also double stack Doorways or Windows.
As each Foundation has it own Column snap points, when Foundations are grouped the ability to double stacks Walls is available, just the thing for Horde bases!
Floors
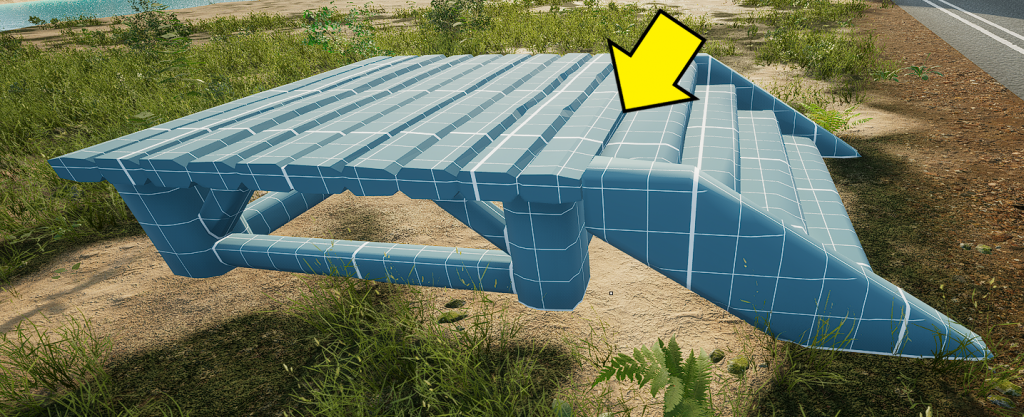
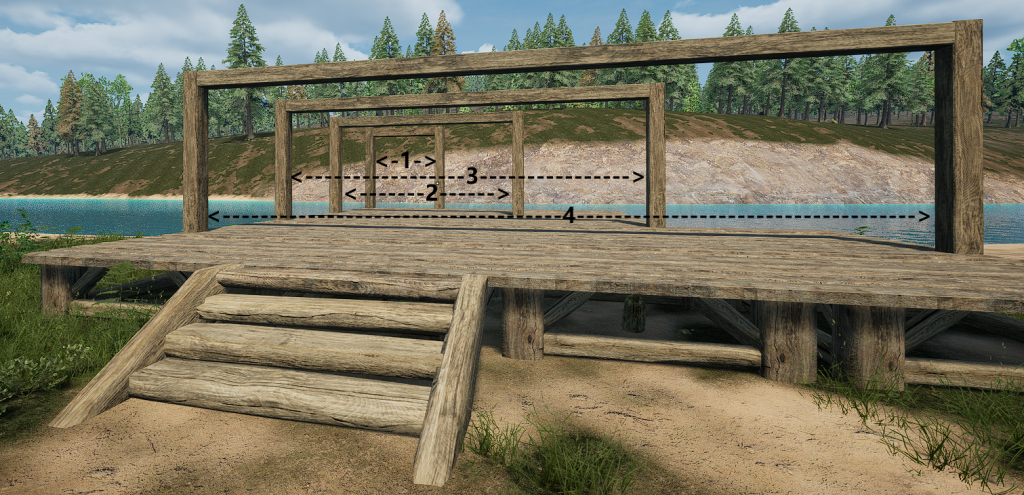
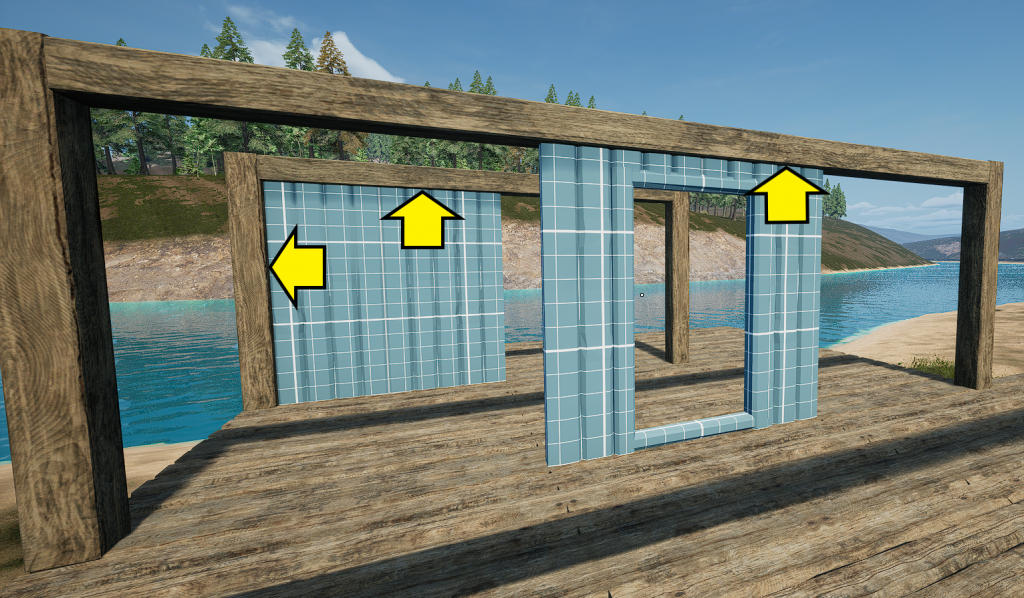
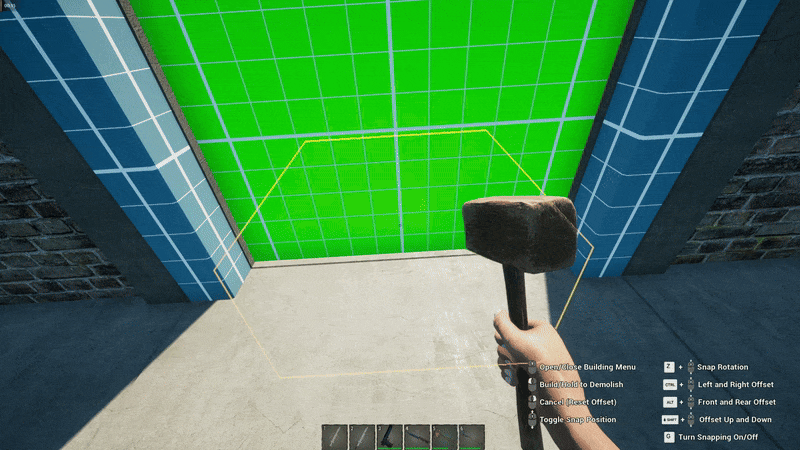
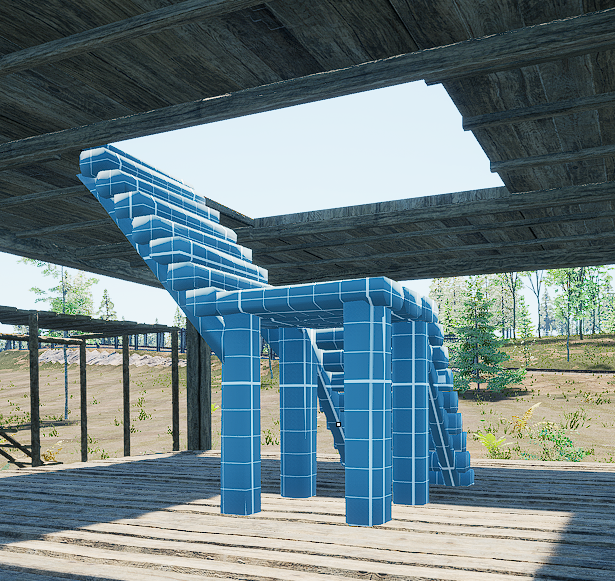
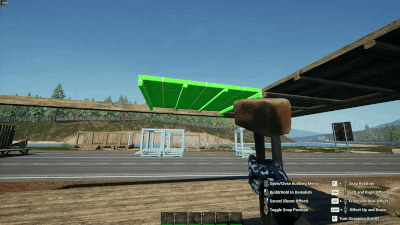
Floors (like Roof pieces) snap more easily to Beams and the image to the right shows that only a single Beam can hold one Floor section and a second Beam would be required where the arrow is. >>>>>
Floors are also used for Ceilings or a Roof and do not suffer any damage from weather but some rain might show get in (known Bug). This can allow for further later expansion.
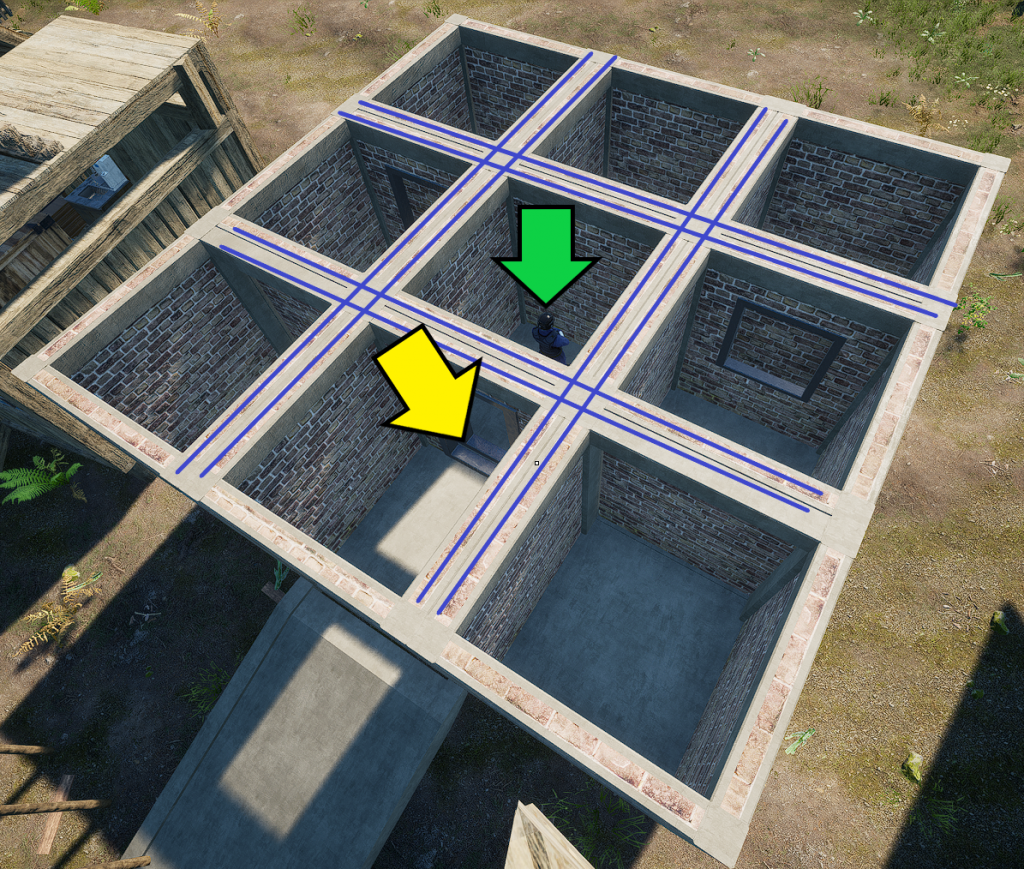
The middle Flooring section cannot be built (its Red) in the below image and it would need another Beam running across where the yellow lines are or make it into the way up to the next level with Stairs.

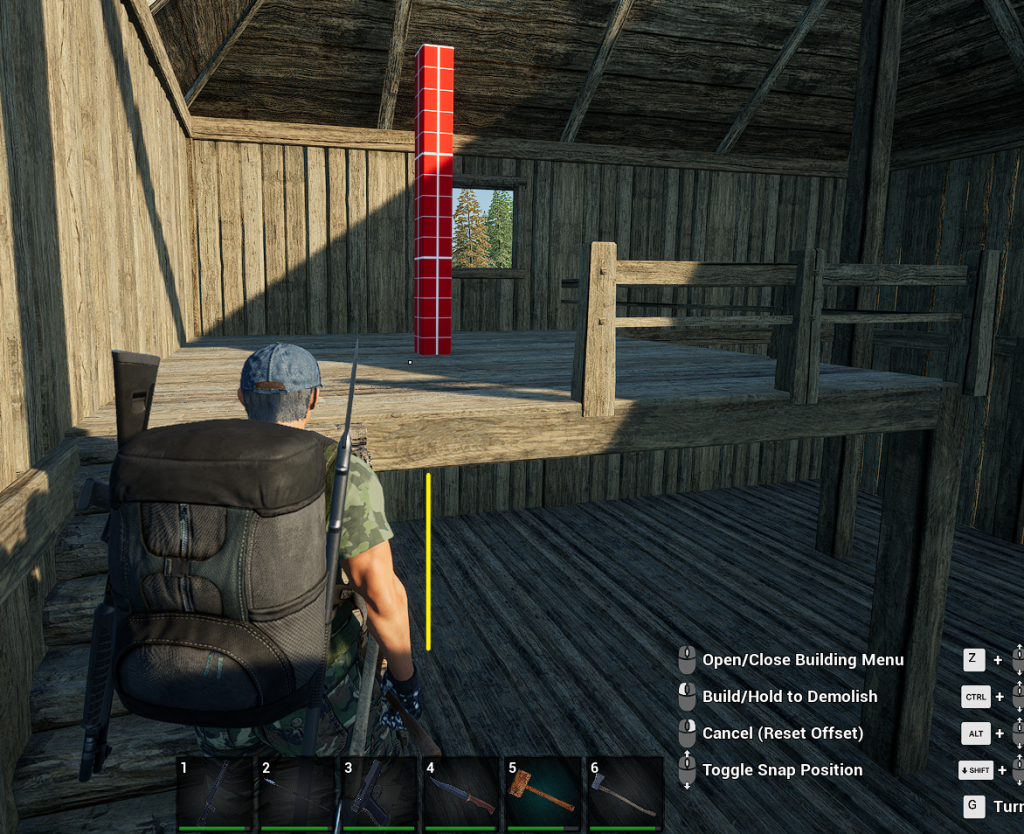
Columns need support from below when building on Floors, either from a Beam crossing over or another Column directly underneath (indicated by the yellow line) as the Floor does not share the weight load across itself.
Floor direction is set by which piece you highlight and then build to.
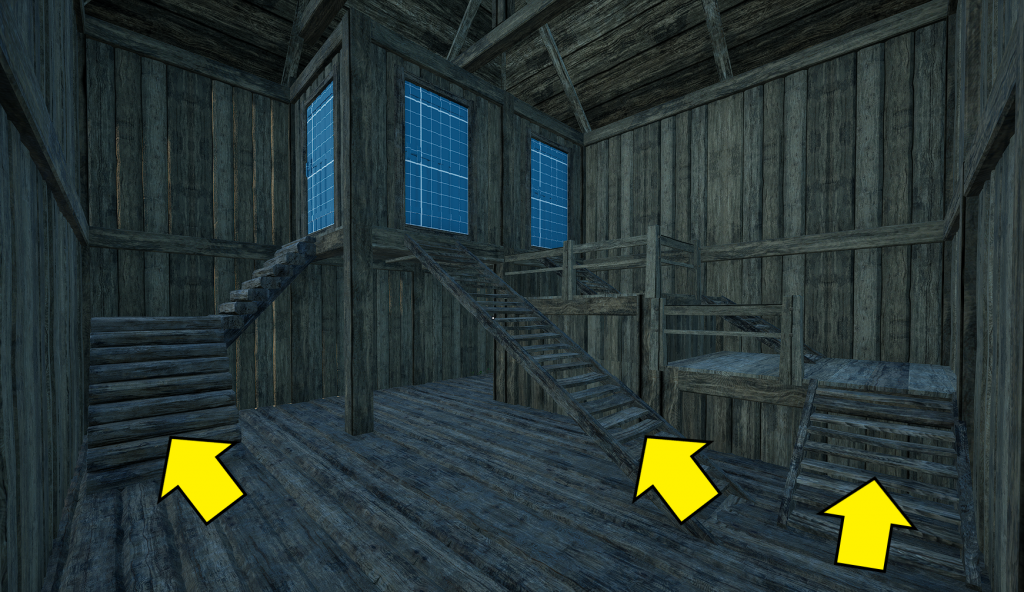
Stairs/Fences
Ramps and Stairs (Structure & Outside) connect directly to Foundations with Stairs Corner being placed outside on the ground or on Foundations and they snap to their own rotation, note they are right handed only. Staircases snap to Beams and/or Floors depending how they are built.
Below is 3 Ways to get reach the First Floor.
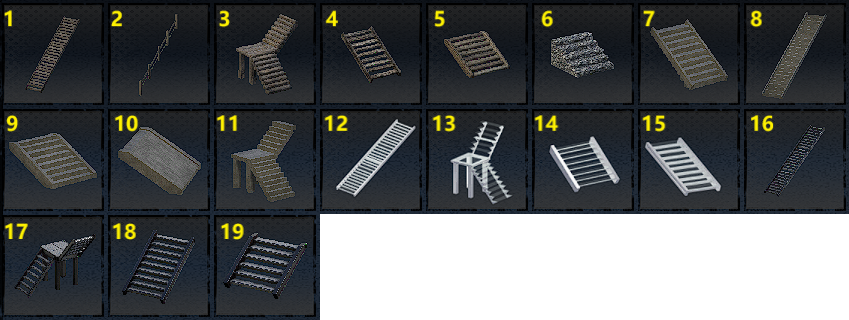
- Stairs Long (Wooden).
- Stair Railing (Handrail for #1 -Wooden).
- Stairs Corner (Wooden Log).
- Stairs (1/3 High Wooden).
- Wooden Stairs (Outdoor).
- Stone Stairs (Outdoor).
- Stairs (Concrete) same function as #4.
- Stairs Long (Concrete) same function as #1.
- Stairs (Concrete) same function as #5.
- Cement Ramp (used for Vehicles).
- Stairs Corner (Concrete) same function as #3.
- Stairs Long (Glass & Metal) same function as #1.
- Stairs Corner (Glass & Metal) same function as #3.
- Stairs Outdoor (Glass & Metal) same function as #5).
- Stairs(Glass & Metal) same function as #4).
- Stairs Long (Metal) same function as #1.
- Staircase Corner (Metal) same function as #3.
- Stairs(Metal) same function as #4).
- Stairs Outdoor (Metal) same function as #5).
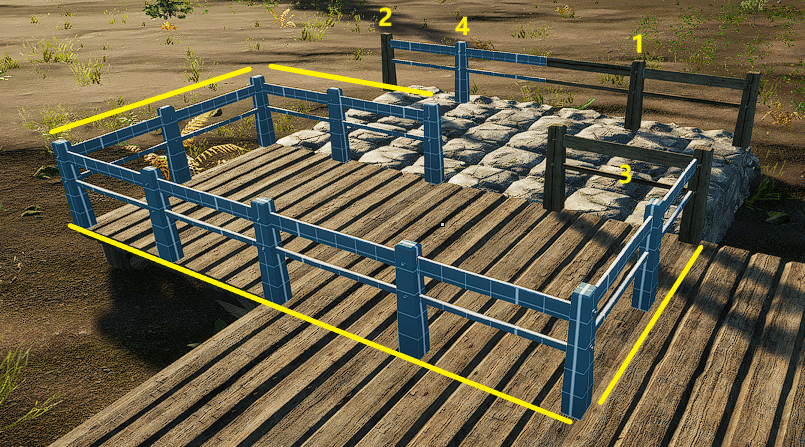
Fences
Fences are made up of Handguard (#2) (which snap in place when the Fencing is placed first), Half Guardrail (#3) and Full Guardrails (#1) and (#4).
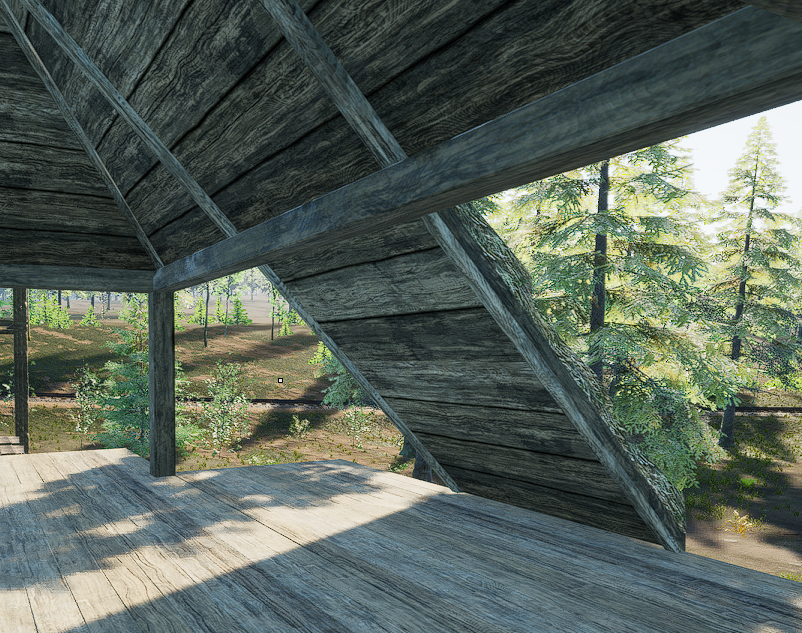
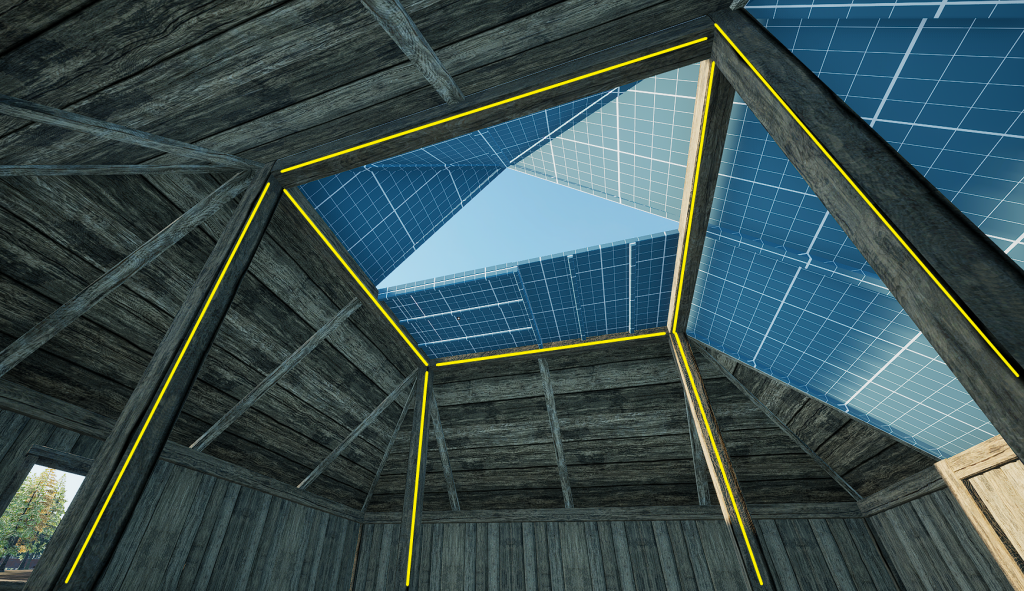
Roofing
Finishing off with Roof Corners, Flat End sections and Single pieces. At 0:46 There is an option for 45° wall ends as well as the 20 °.
Best practice is to connect Roof pieces to Beams but it is possible but very difficult to place Roof sections on Walls which doesn’t look good if fitted incorrectly.
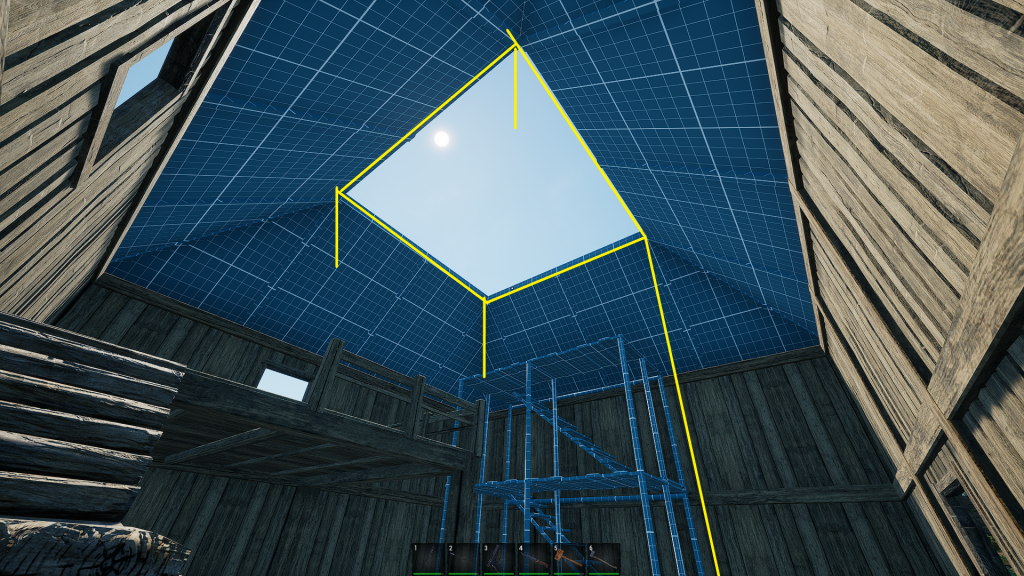
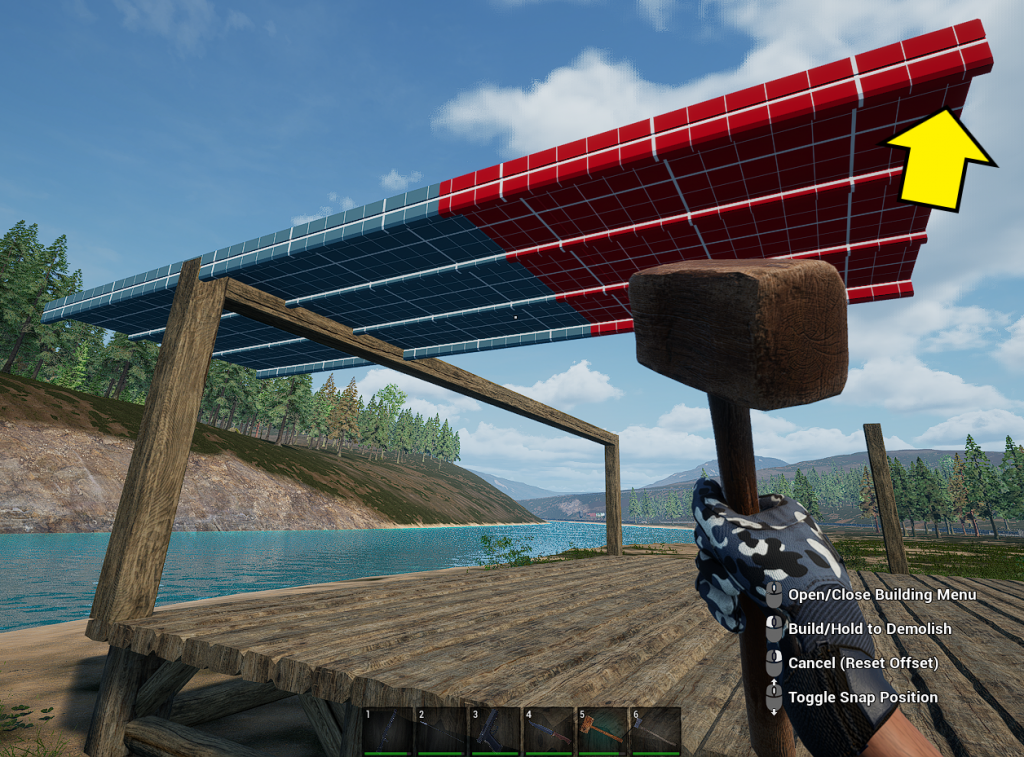
The middle 4 squares are not supported by any Beams and needs further support from more Columns as indicated by the yellow lines.>>
Roof pieces cannot support other roof pieces but they can not only go from a Beam upwards but from Beam/Roof piece to Floor.
Now the first part of the roof has support the last 4 middle squares can be filled with Roof pieces or Floor sections as a ceiling.
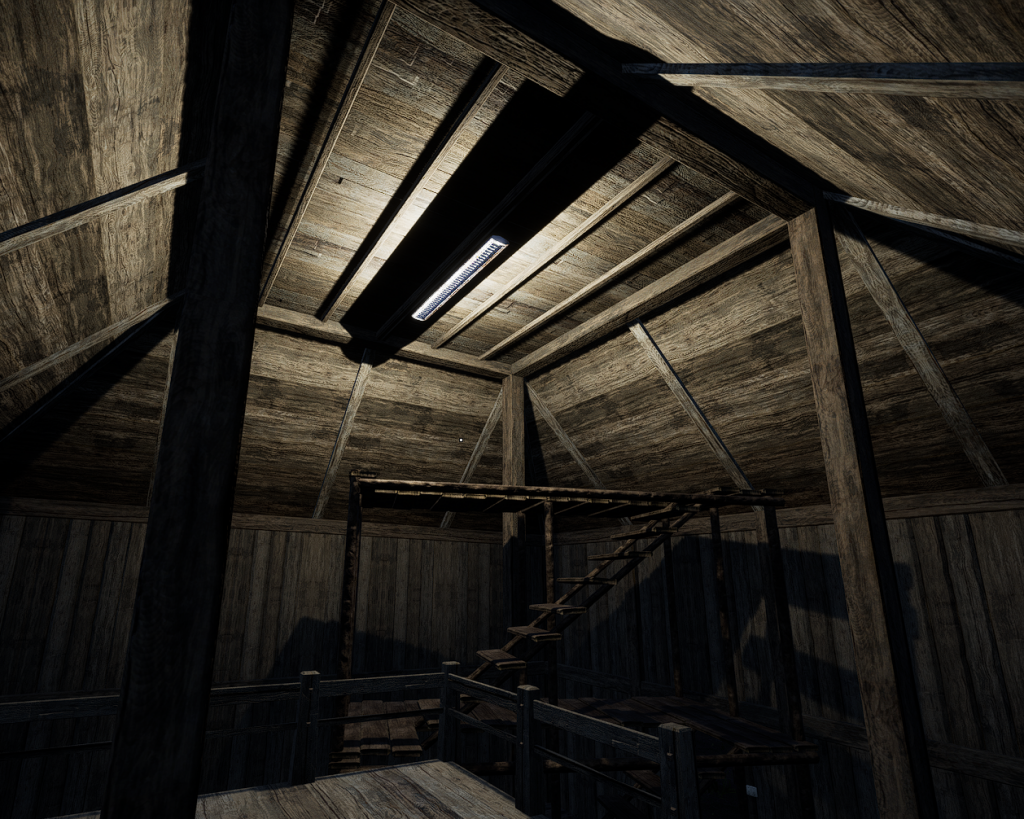
A flat high ceiling can be useful when hanging light fixtures once power is established at base and the Scaffold is a really useful temporary item to reach high ceilings. A standard Storage Box can also be used to stand on if area too small to fit the Scaffold. See Outdoor for more on scaffolding.
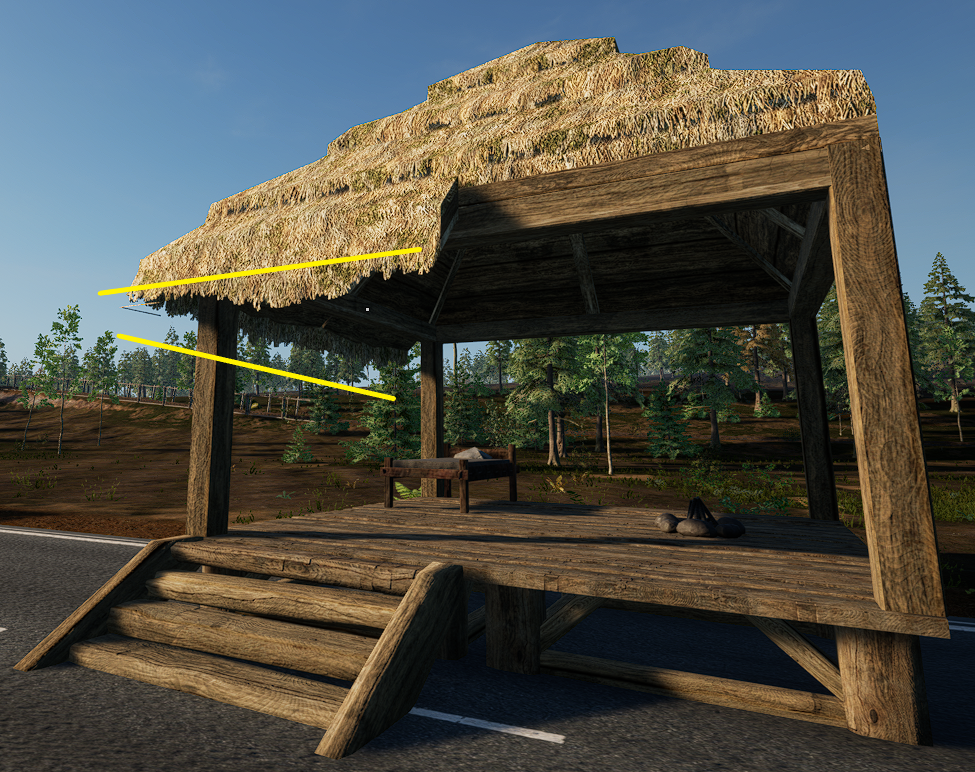
Eaves
Eaves are the edges of a roof that extend past the side of a building. It comes in Thatch and Stone only. Seems more decorative than functional?
Workshop
The Workshop tab is where all the crafting items and unlocks from the Technology Tree are mostly found and are covered in more detail in other guides. Electric lights, Switches, Refrigerator and Freezer are found in the Furniture tab.
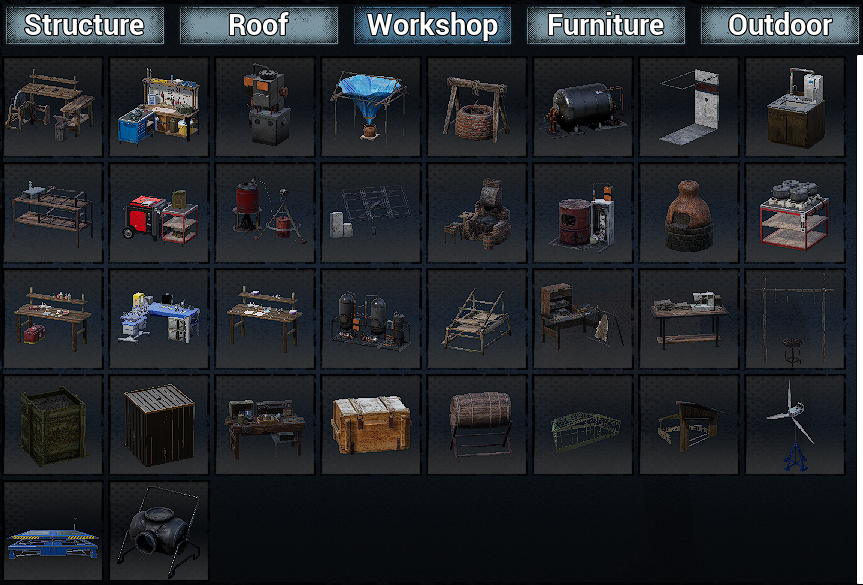
- More information on Crafting Tables/Workbenches is here.
Furniture
- Safezone/Territorial Table- See below.
- Storage Box- Stacks in 3 with Wooden Box Frame1.
- Straw Bed- Place to sleep and set a Respawn Point2.
- Single Bed- Upgrade in style to Straw Bed.
- Double Bed- Upgrade in style but only sleeps one.
- Chair- Interact to sit in.
- Table- No storage but items can placed on top.
- Sofa- Interact to sit in.
- Garbage Can- Put items in to delete them from game3.
- Street Sign- Displays written text on it4.
- House Number- Displays written text on it5.
- Log Rack- Holds Logs.*
- Stick Rack- Holds Sticks.*
- Stone Basket- Holds Stones*
- Plank Rack- Holds Planks*
*All Racks act as Primary Interact key (E) takes one item but the Secondary Interact Key (F) adds one.
Items boxed in Yellow are purely decorative but the four mounted heads need the relevant Animals Head in its construction.
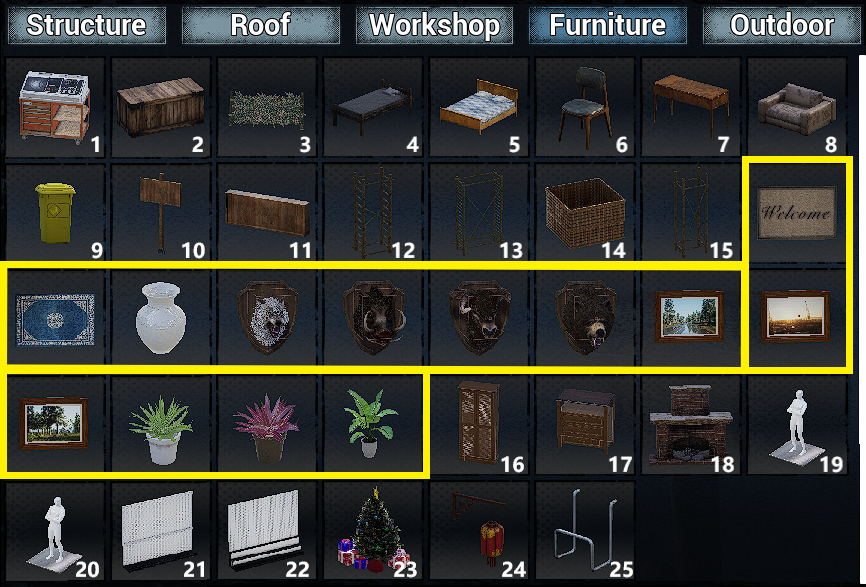
- 16. Wardrobe- Holds (14×20).
- 17. Bedside Table- Holds (15×8)
- 18. Fireplace- Used like the Campfire but no space for a Cooking Pot.
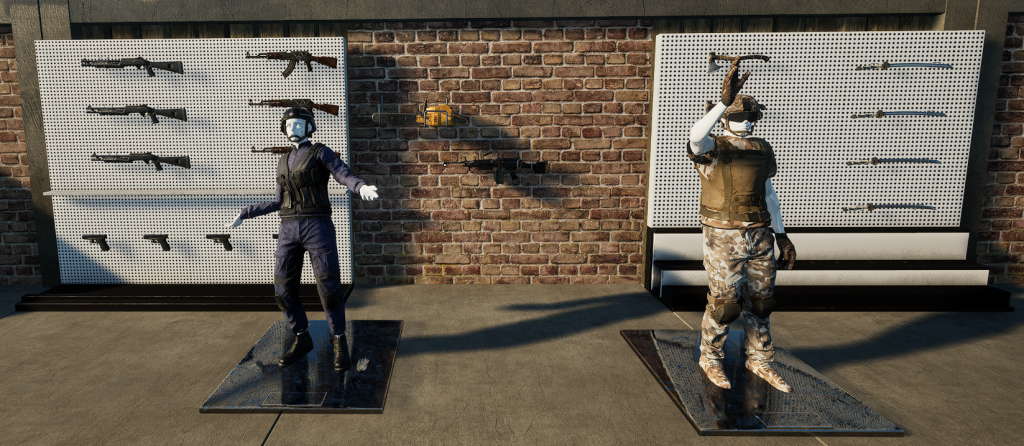
- 19 & 20- Male and Female Mannequins6.
- 21. Gun Rack- Holds 6 Rifles and 4 Handguns.
- 22. Weapons Rack- Holds 8 Melee Weapons.
- 23 & 24 Xmas Tree and Chinese Lantern (Lights, both need power).
- 25. Weapon Wall Hook- Displays one weapon of any type.
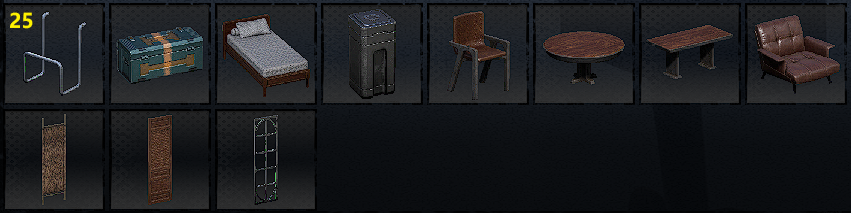
Update 1.0 introduced a new Iron Box with increased Storage, a Bed, a Garbage Can, 2 Chairs and Tables and 3 Folding Screens.
Furniture Footnotes
- Wooden Box Frame and Storages Boxes requires unlocking in the Technology Tree. ↩︎
- Respawn Points are needed in case of death and remember to set the it to the nearest one when playing ↩︎
- When “Empty” is pressed all contents are gone permanently. Can be used as early game storage (14×8) if used with care… ↩︎
- Displays the text on the Main Map also. ↩︎
- Useful for labelling Switches, marking Doors and Storage. ↩︎
- Can be dressed with clothing and each has 10 setable poses (The square marks the front facing when placing). ↩︎
Mannequin Poses
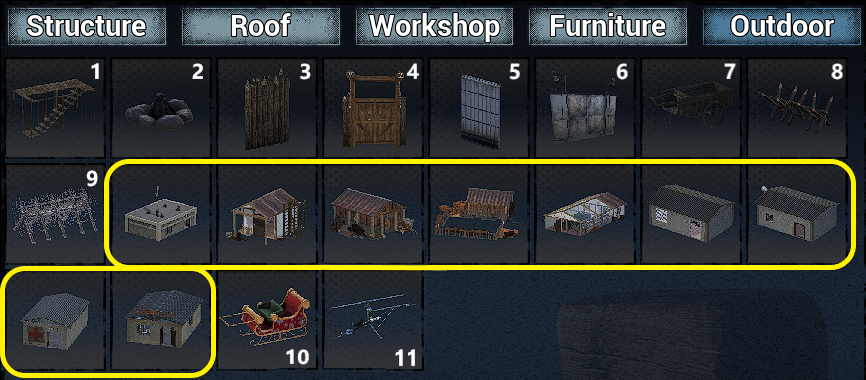
Outdoor
- Scaffold- (See further below).
- Campfire (For Cooking and a Heatsource).
- Wooden Fence (Basic Palisade defence).
- Wooden Gate- (Manual Operation).
- Iron Gate- (Sturdier than Wood).
- Iron Gate- (Sturdier and Manual Operation).
- Handcart- (See below).
- Wood Spikes (Traps).
- Iron Spikes (Sturdier Traps).
- Reindeer Trailer (Xmas Storage item (Holds-20×14).
- Homemade Helicopter (More information here).
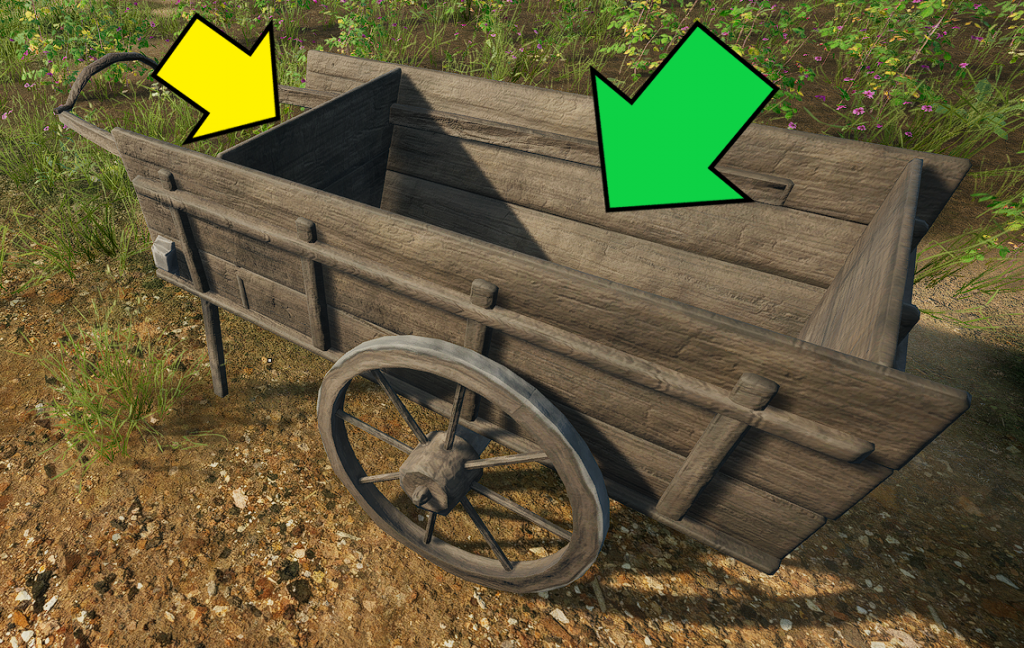
Handcart
(7) Similar to a Rickshaw but it doesn’t take passengers only to be used as portable storage which holds 20×20 and it takes x15 Planks and x8 Simple Parts to construct.
The Handcart fills and empties with cardboard boxes to represent its current capacity. The Yellow arrow is where to interact (Secondary “F” keybind) with it to attach yourself and pull it along with the Green arrow showing the Inventory access. You can access the inventory whilst being attached to it by turning sharply.
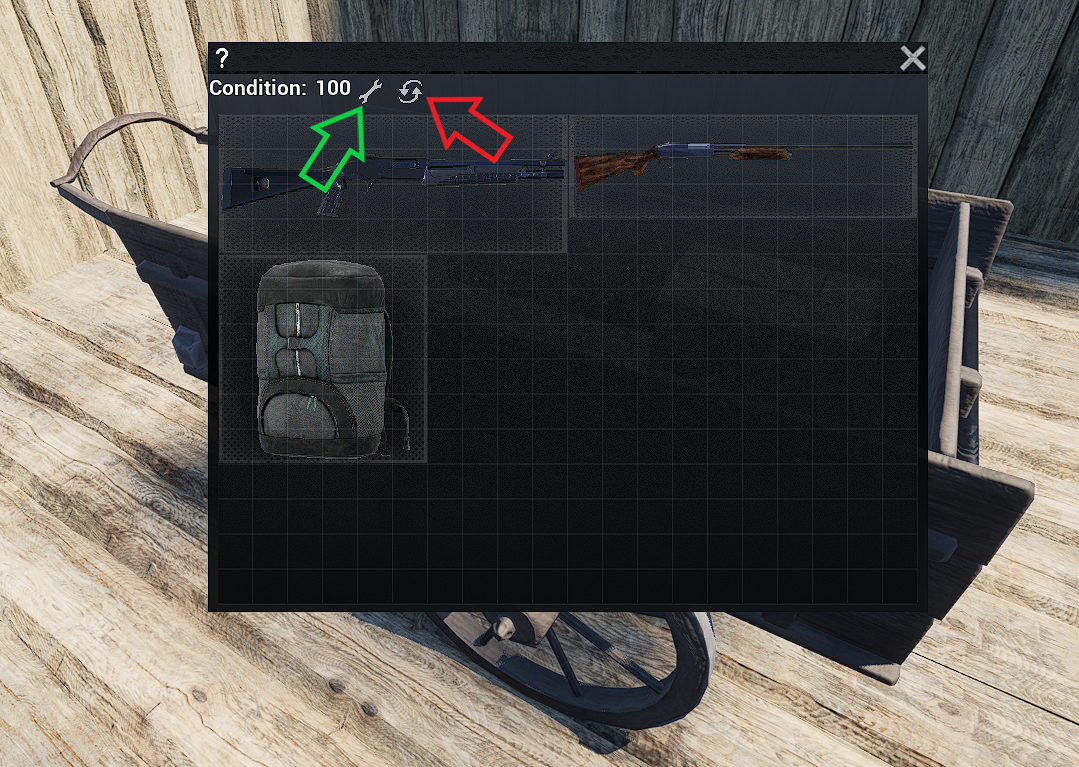
- Green Arrow shows the spanner to click on to repair the Handcart with 5 Planks placed inside it.
- Red Arrow is the new reset option much like the function on Vehicles (bounces free of obstacles).
Its condition is shown in the top left when accessed and its contents drop onto the ground when the Handcart is destroyed.
Showing how to access the Cart in game. >>>>
You cannot “Sprint” whilst pulling it normally, only jog!
Working at height
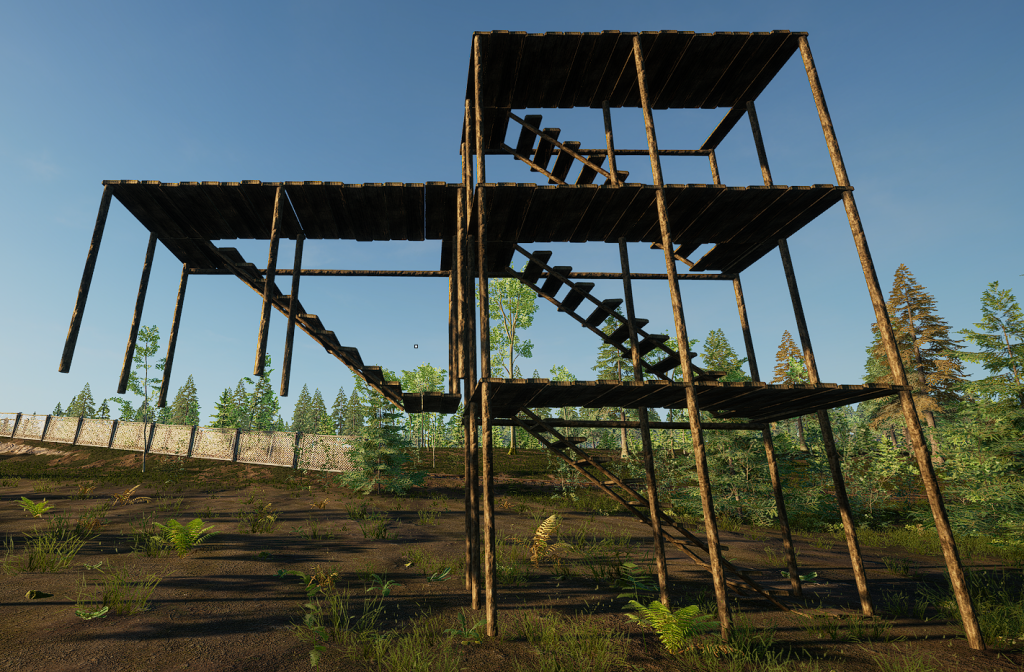
Scaffold found in the “Outdoor” tab in the Build Menu can be built to access can high up areas or to get on to the roof to finish adding materials.
It doesn’t need unlocking and requires x15 planks and x2 Wooden Sticks to build. All the materials are regained when the Scaffold is destroyed.
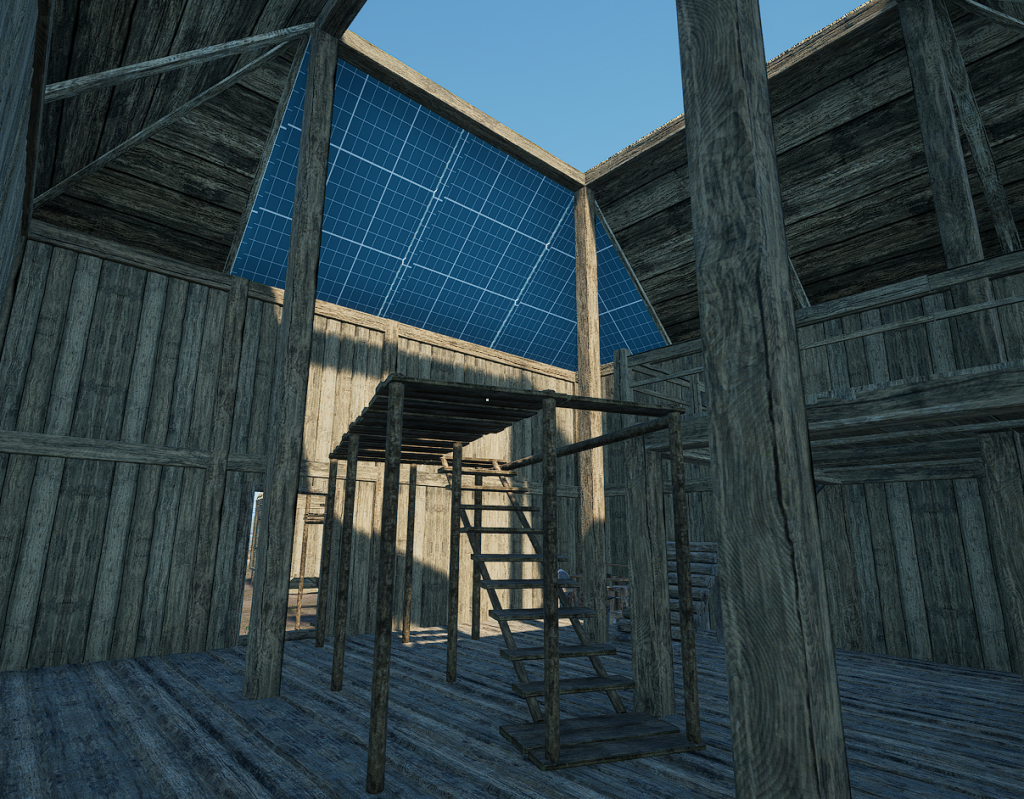
Scaffold can be built vertically and horizontally but take care as falling from over one storey high results in taking Damage and falling from over 6 high results in Death.
Scaffold can be built vertically and horizontally but take care as falling from over one storey high results in taking Damage and falling from over 6 high results in Death. Make sure you have a Bed with a Spawn Point set!
Construction Materials
Building in this game is a little more complicated than some other games and it is about resource, inventory, and weight management. Make sure you have the necessary resources to build structures. Move the items in your limited inventory space to fit them and manage your weight as your Character’s Movement Speed slows down significantly when encumbered.
There are many types of building materials:
- Wood (Chop down Trees and Bushes with an Axe for Logs, Sticks and Plant Fibre. Planks are made from logs in the Crafting Table.
- Stone (Pick up off the ground or mined).
- Brick (Looted or made in a Furnace).
- Concrete (Cement & Iron, Looted or Crafted in Furnaces).
- Glass/Metal Glass (Glass & Iron Crafted in a Smelting or Electric Furnace).
- Metal (Iron and Steel Crafted in a Smelting or Electric Furnace).
Structure
- Floors & Foundations– Wood (Planks & Sticks), Stone, Concrete (Cement & Iron Ingots), Metal Glass (Glass & Iron Ingots) or Metal (Iron and Steel Ingots).
- Wall, Windows and Doors– Wood (Planks & Sticks), Stone, Brick (Cement & Bricks), Metal (Iron Ingots) or Metal (Iron and Steel Ingots).
- Beams & Columns– Wood (Logs), Stone, Concrete (Cement & Iron) or Steel (Iron Ingots*).
- Fences– Wood (Planks).
- Stairs & Ramps– Wood (logs, Planks & Sticks), Stone, Concrete (Cement & Iron), Metal Glass (Glass & Iron Ingots) or Metal (Iron and Steel Ingots) .
*= Devs are aware of this error.
Roof
- All Roof Pieces- Wood (Planks and Plant Fibres), Stone (Cement & Bricks**), Metal Glass (Glass & Iron Ingots) or Metal (Iron and Steel Ingots).
- Eaves- Wood (Planks and Plant Fibres) or Stone (Cement & Bricks**)
*= For purposes of this roof type, Stone is not used.
Over your carry weight?
You can roll in the direction the Character is facing by Double tapping “Crouch” to move quicker than walking overburdened.
Or you can “carry” your Backpack, bypassing the Carry Weight completely.
At 0:31 click and hold LMB then close Inventory. The bag model will stay where it is on the ground but will reappear when its placed back on ground (Open Inventory and LMB click on floor).
Damage Resistance
Zombies, Bandits and Wildlife can make short work of a base and other players can raid you especially in PVP Servers. Players can damage structure by shooting, stabbing with a Spear or chopping with an Axe so below is a rough framework of how sturdy each material is to Damage.
Amount of Homemade Grenades (HG) required to destroy the Wall and damage to its Foundation:
(Update 0.0.8.7) changed the damage taken from Homemade Grenades and Explosive Arrows to Walls.
| Grenades Used | ||
| Type | Pre 0.0.8.7 Update | 0.0.8.7 Update* |
| Wood Wall | 1 | 5 |
| Stone Wall | 3 | 24 |
| Cement Wall | 3 | 24 |
| Metal Glass Wall | 2 | 24 |
| Full Metal Wall | N/A | 40 |
| Wooden Fence | 3 | 21 |
| Wooden gate | 4 | 42 |
| Iron Fence | 9 | 84 |
| Iron Gate | 9 | 84 |
*Estimated calculations.
Safezone/TERRITORIAL Table
Safezone or Territorial Table does not need unlocking and is found under the “Furniture” tab in the Building Menu. It requires only x1 Log to build.
You must build your own Safezone Table to request access to another safezone protected base.
In the above example the player called 313VeeGaming (Character Vee3po) has asked for access using their table and was then authorised. Their name was listed so access to their base could be applied for if required.
It prevents any unauthorised players accessing Storage, Crafting Tables etc, Opening Doors/Windows and Crop Boxes but Wood racks or Stone baskets can still be opened and Loot taken.
Tip- Garage your vehicles and don’t leave any windows or doors open!
Safezones do not prevent Damage to your base from other players!!!
Access can be revoked by “Remove Authorisation” in the Authorised Tab.
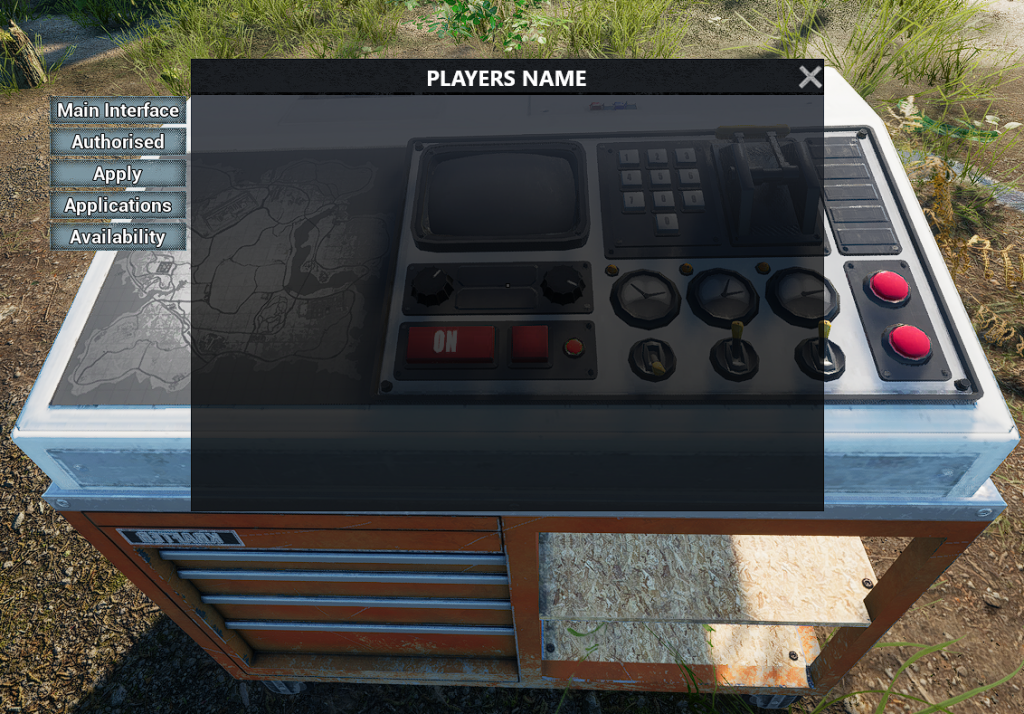
- Main Interface– Shows Safezone Owners Steam name.
- Authorised– Lists who has access other than owner.
- Apply– List all players with a Safezone built and used to request access to another Players safezone.
- Applications– Lists players who have applied for authorisation.
- Availability– Shows a blue dome radius of the protected zone.
The Safezone Table needs to be kept safe as if destroyed, access is reverted back to anyone and the base is unprotected!
Video Guides
Base Building
@313veegaming.com >
Get a small Starter Base up